Baked Coho salmon with garlic, dill, and roasted potatoes.

Coho Salmon Recipe: A Complete Guide to Cooking and Enjoying

Grilled Coho salmon with roasted vegetables and lemon garnish.

Do you want to cook something delicious yet healthy? Coho salmon is your perfect catch! This versatile fish is not only packed with nutrients but is also super easy to cook in a variety of ways. This Coho salmon cooking guide covers everything you need to know about preparing, cooking, and enjoying this versatile fish. Whether you’re a kitchen newbie or a seasoned chef, this guide has got you covered.

What is Coho Salmon?

In this Coho salmon cooking guide, we’ll explore why this fish is so beloved by chefs and home cooks alike. Its vibrant orange flesh and mild, delicate flavor make it a favorite for many seafood lovers. So, what makes Coho salmon special?

Understanding Coho Salmon: Taste and Texture

Coho salmon has a slightly milder taste compared to other types like Chinook or Sockeye. The texture is firm yet tender, making it ideal for grilling, baking, or even raw dishes like sushi. It’s like the “Goldilocks” of salmon—not too fishy and not too bland.

Why Choose Coho Salmon Over Other Types?

Looking for the perfect salmon for a family dinner? Coho salmon strikes the right balance between flavor and affordability. Plus, it’s easier to find in local stores or online. Compared to other species, Coho is less fatty, which makes it lighter on the palate and perfect for those who don’t enjoy overly rich fish.

“Cooking Coho salmon is like playing your favorite tune on repeat—it never gets old.”

Nutritional Benefits of Coho Salmon

Our Coho salmon cooking guide emphasizes not only how to cook this fish but also why it’s such a nutritional powerhouse. Let’s break it down.

Rich in Omega-3 Fatty Acids

Omega-3s are the superheroes of the nutrition world, and Coho salmon is loaded with them. These essential fatty acids help improve heart health, reduce inflammation, and even enhance brain function. Who wouldn’t want a meal that’s both tasty and healthy?

Vitamins and Minerals in Coho Salmon

Think of Coho salmon as nature’s multivitamin. It’s packed with Vitamin D, which is great for your bones, and Vitamin B12, which supports your energy levels. Add to that a generous dose of selenium and potassium, and you’ve got a complete nutritional package.

Health Benefits: Heart and Brain Health

Eating Coho salmon regularly can do wonders for your heart. The omega-3s help lower bad cholesterol while boosting good cholesterol. Plus, the nutrients in this fish are known to improve brain health, making it a brain-boosting meal for kids and adults alike.

“They say you are what you eat—so why not eat something that fuels your heart and mind?”

Preparing Coho Salmon for Cooking

Before you grab your skillet or fire up the grill, proper preparation is key. Let’s walk through how to choose, clean, and store Coho salmon to ensure you get the best results.

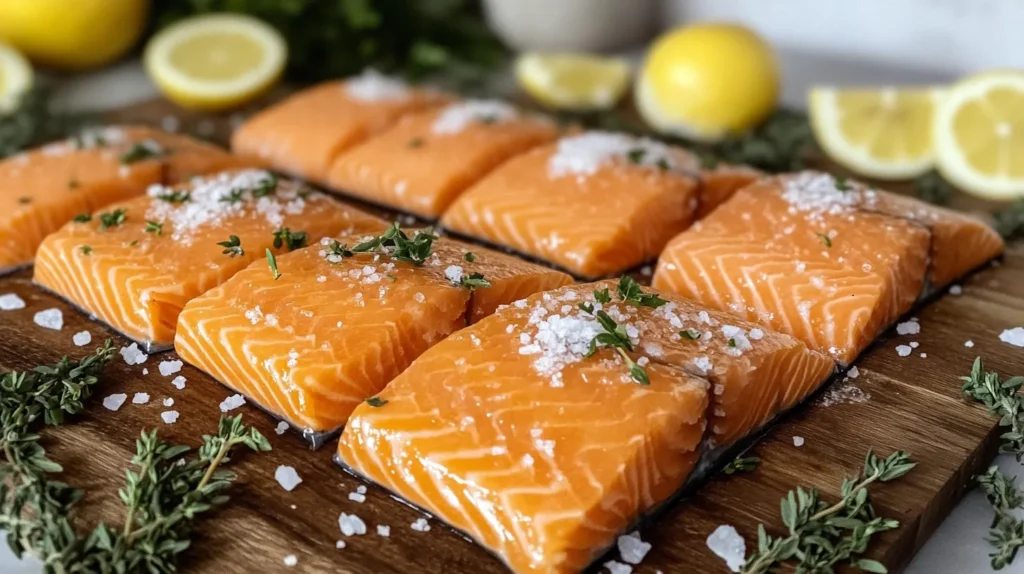
How to Select Fresh Coho Salmon

When buying Coho salmon, look for bright, shiny skin and firm flesh. The smell should be mild—like the ocean, not fishy. If you’re buying fillets, they should be moist but not slimy. Shopping tip: Always check the label for sustainably sourced options.

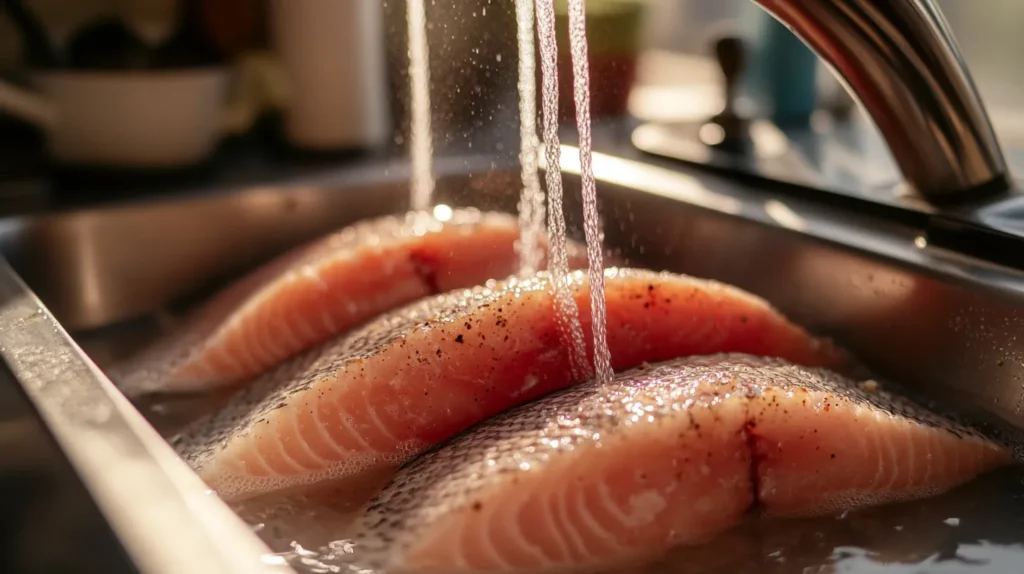
Cleaning and Deboning Techniques

Cleaning salmon might sound intimidating, but it’s easier than you think. Rinse the fish under cold water and pat it dry with paper towels. If you’re dealing with a whole fish, remove the scales using the back of a knife. For fillets, use tweezers to pluck out any tiny bones. Trust me, no one likes a surprise bone in their bite!

Best Ways to Store Coho Salmon

Not planning to cook it right away? Fresh Coho salmon should be stored in the fridge at 32°F and cooked within two days. For longer storage, freeze it. Wrap the fish tightly in plastic wrap and store it in an airtight bag. Proper storage preserves the flavor and texture, so you’ll enjoy it as if it were fresh.

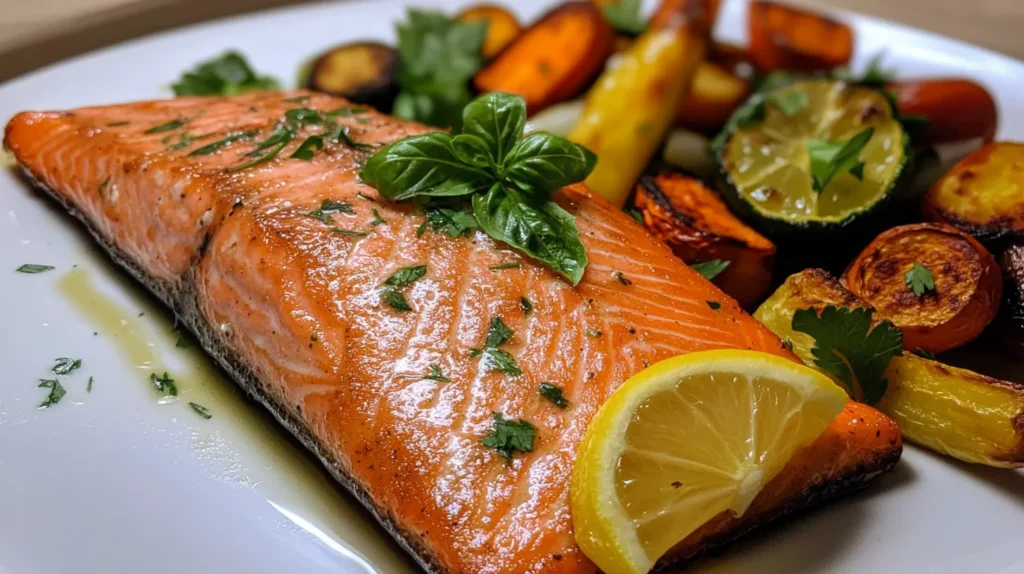
Cooking Methods for Coho Salmon

Now that your Coho salmon is prepped and ready, it’s time to cook it. The beauty of Coho salmon is highlighted in this Coho salmon cooking guide, showcasing its versatility. Whether you prefer grilling, baking, or pan-searing, there’s a cooking method that will bring out its best flavors. Let’s explore the most popular ways to cook Coho salmon, step by step.

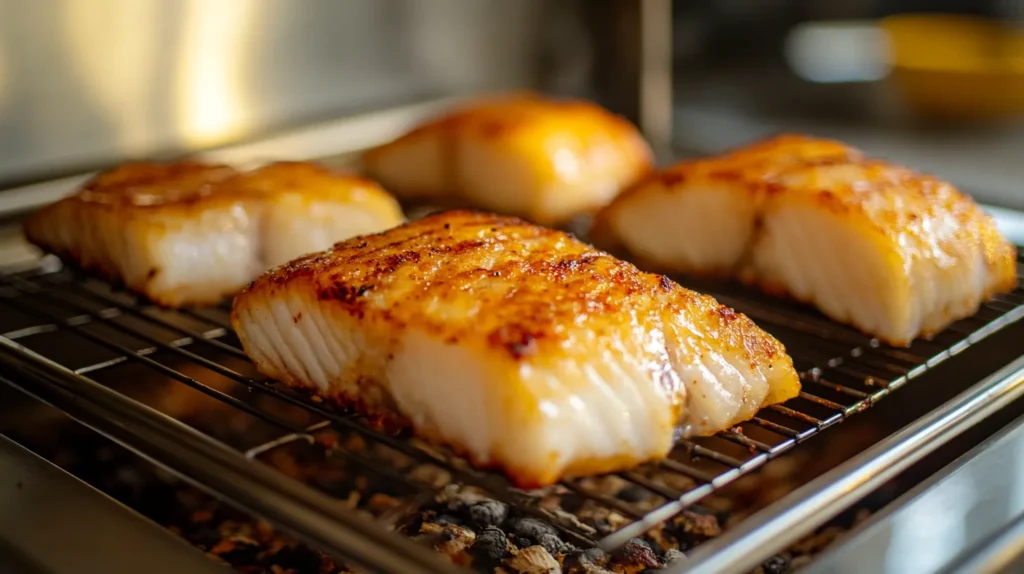
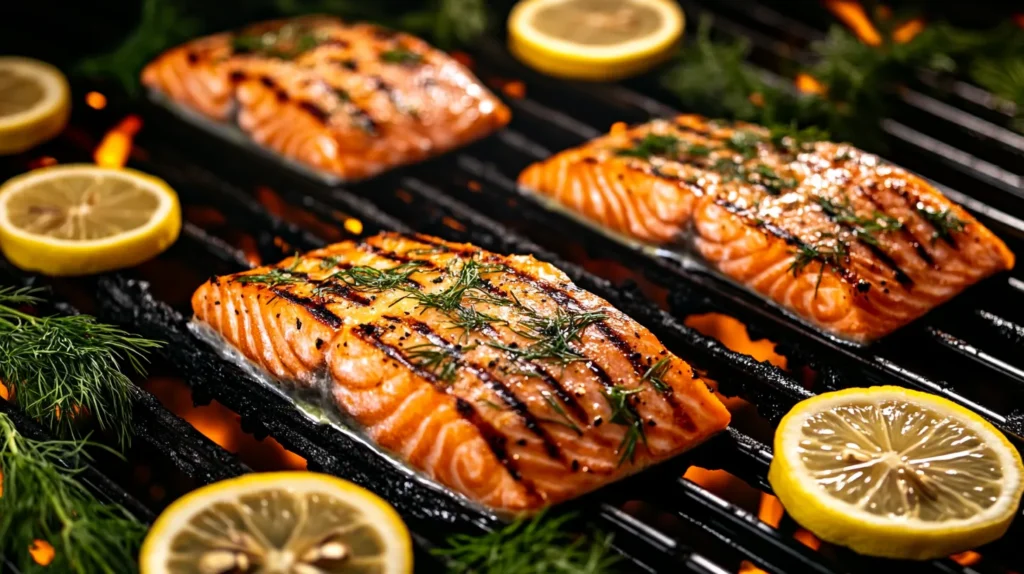
Grilling: Tips for Perfectly Grilled Coho Salmon

Grilled Coho salmon fillet on a cedar plank with asparagus.

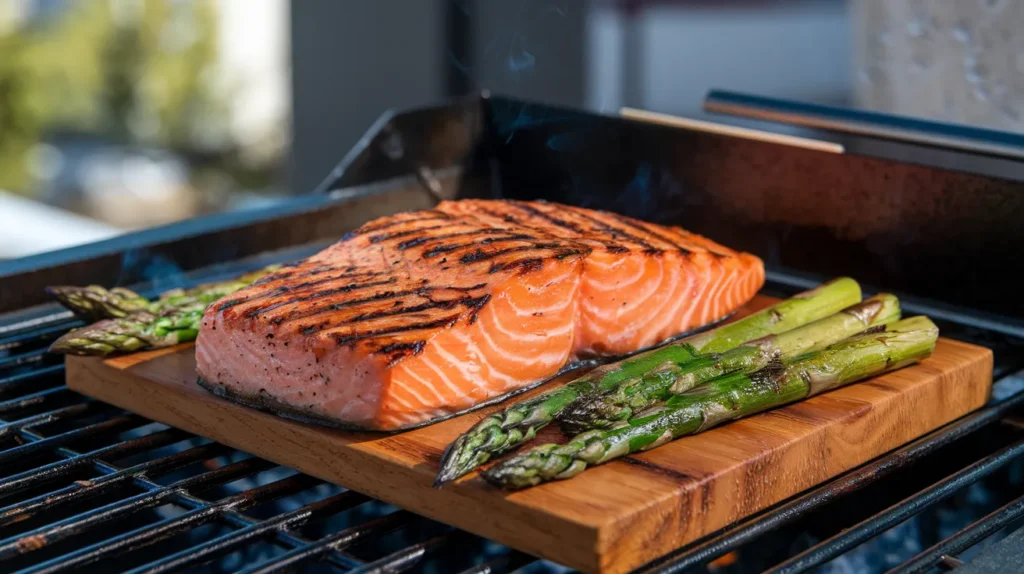
Grilling Coho salmon adds a smoky flavor that complements its natural richness. Here’s how to do it like a pro:

  1. Preheat Your Grill: Set it to medium-high heat.
  2. Prep the Salmon: Brush the fillets with olive oil and season with salt, pepper, and your favorite herbs.
  3. Use Foil or Cedar Planks: To avoid sticking, grill on a piece of foil or a soaked cedar plank.
  4. Grill Time: Place the salmon skin-side down and cook for about 6-8 minutes per inch of thickness. Flip once, and cook for another 3-4 minutes.

Pro Tip: Don’t overcook! A perfectly grilled Coho salmon should flake easily with a fork but still be moist in the center.

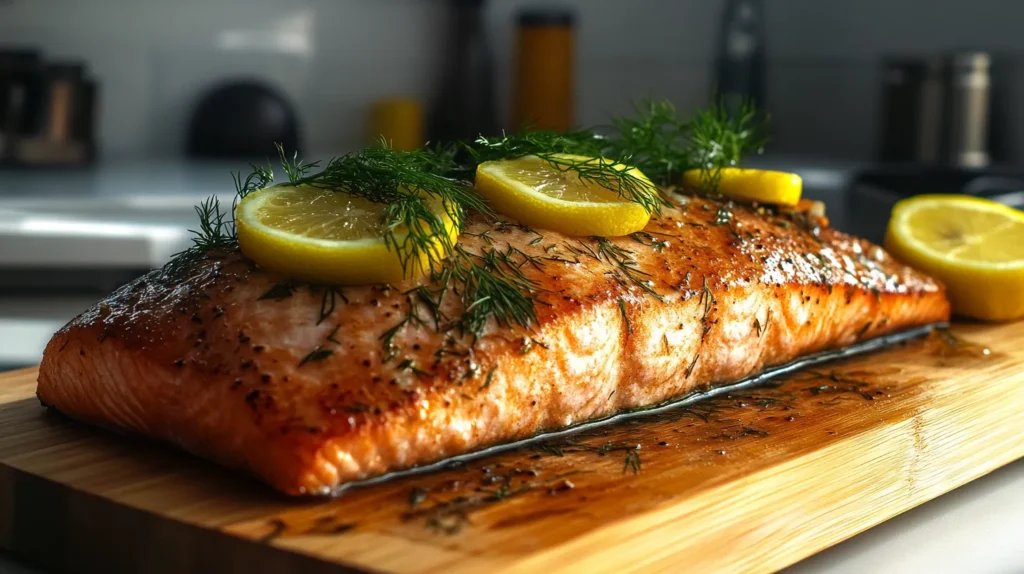
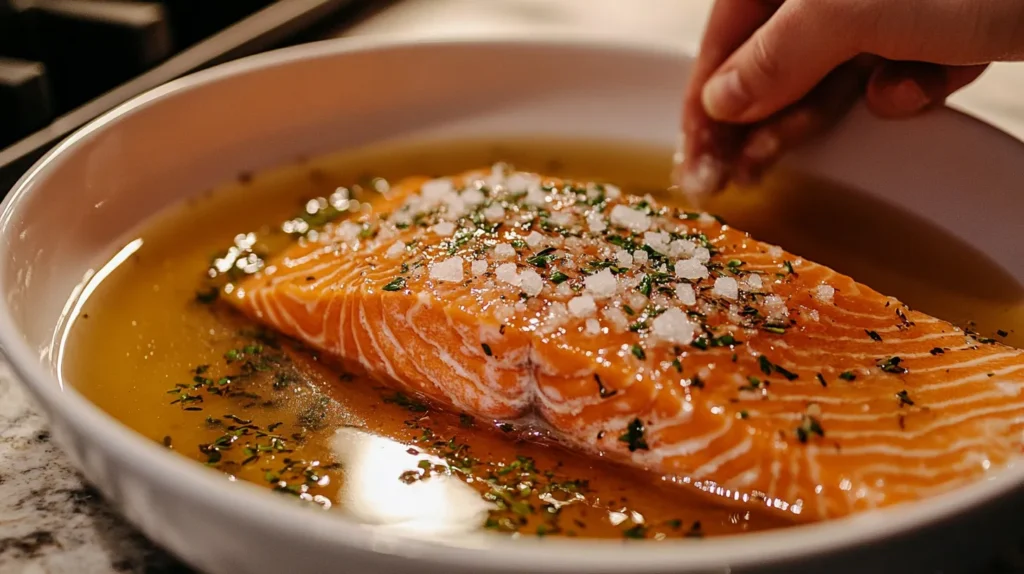
Baking: How to Retain Flavor and Moisture

Baking is one of the easiest methods to cook Coho salmon. It’s perfect for beginners and ensures the fish stays juicy.

  1. Preheat the Oven: Set it to 375°F (190°C).
  2. Season Generously: Create a simple marinade with lemon juice, garlic, and dill, or use your favorite spice mix.
  3. Wrap It Up: Place the salmon on parchment paper or foil, fold the edges to create a packet, and seal tightly.
  4. Bake: Cook for 12-15 minutes. The salmon is done when it reaches an internal temperature of 145°F.

“Baking salmon is like wrapping a gift—you seal in all the goodness and flavors.”

Pan-Seared Coho Salmon: A Quick and Easy Option

Short on time? Pan-searing Coho salmon gives you crispy skin and a flavorful crust in minutes.

  1. Heat the Pan: Use a non-stick skillet and heat a tablespoon of oil until shimmering.
  2. Season the Salmon: Pat the fillets dry and sprinkle with salt and pepper.
  3. Cook Skin-Side Down: Place the salmon in the pan, skin-side down, and press gently with a spatula to keep it flat. Cook for 3-4 minutes.
  4. Flip and Finish: Turn the salmon over and cook for another 2-3 minutes.

Pro Tip: For extra flavor, add a knob of butter and a sprig of thyme to the pan during the last minute of cooking.

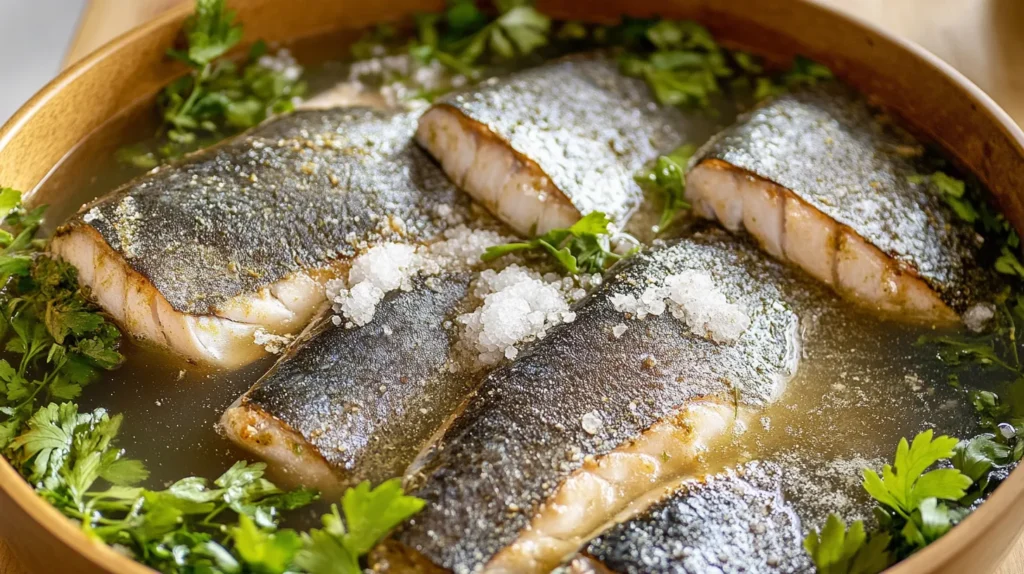
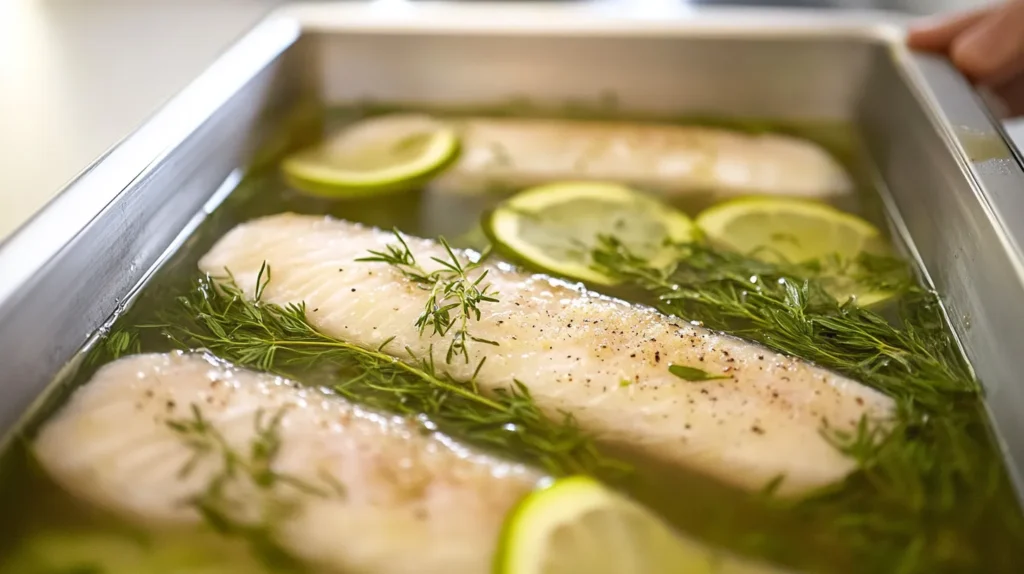
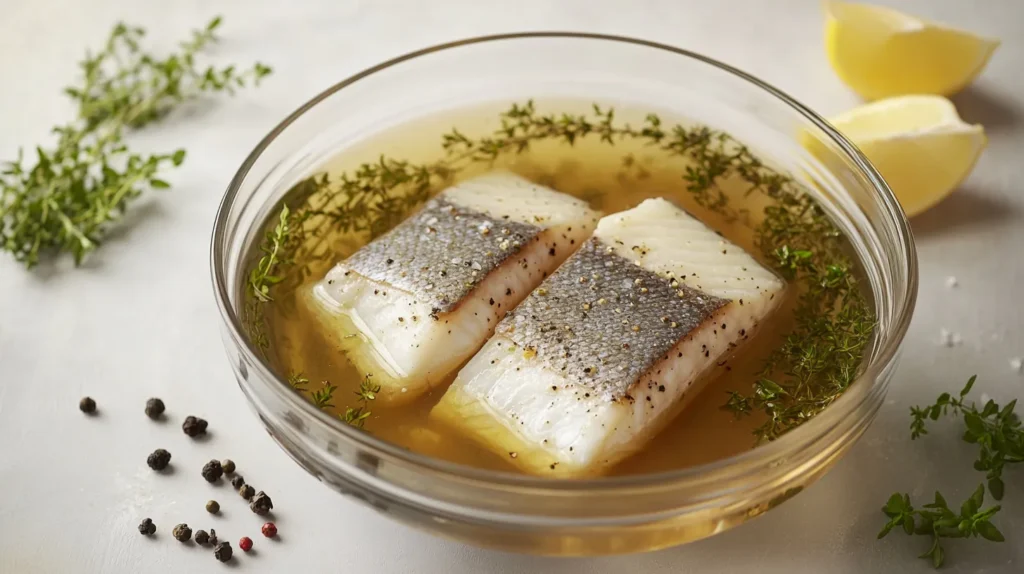
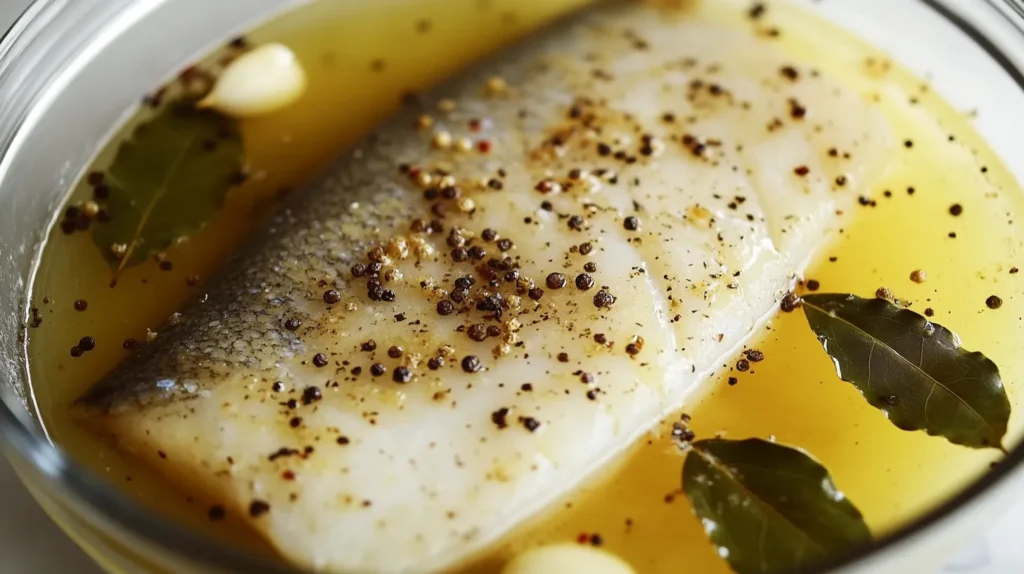
Poaching Coho Salmon: Preserving Natural Flavor

Poaching is a gentle cooking method that keeps Coho salmon tender and highlights its natural taste.

  1. Prepare the Poaching Liquid: Fill a large pan with water, add a splash of white wine, lemon slices, and fresh herbs.
  2. Heat the Liquid: Bring it to a gentle simmer, not a rolling boil.
  3. Add the Salmon: Place the salmon fillets in the liquid and cook for 10-12 minutes.

“Poaching salmon is like giving it a warm bath—it comes out tender, moist, and full of flavor.”

Baked Coho salmon with garlic, dill, and roasted potatoes.

Ready to put these cooking methods to use? Here are some tried-and-true Coho salmon recipes that are sure to impress.

Grilled Coho Salmon with Lemon and Herbs

This simple recipe highlights the fish’s natural flavors.

  • Ingredients: Coho salmon fillets, olive oil, lemon juice, fresh dill, salt, and pepper.
  • Instructions:
  1. Preheat the grill and season the salmon with olive oil, lemon juice, and dill.
  2. Grill skin-side down for 6-8 minutes. Flip and cook for another 3 minutes.
  3. Serve with a fresh salad or grilled vegetables.

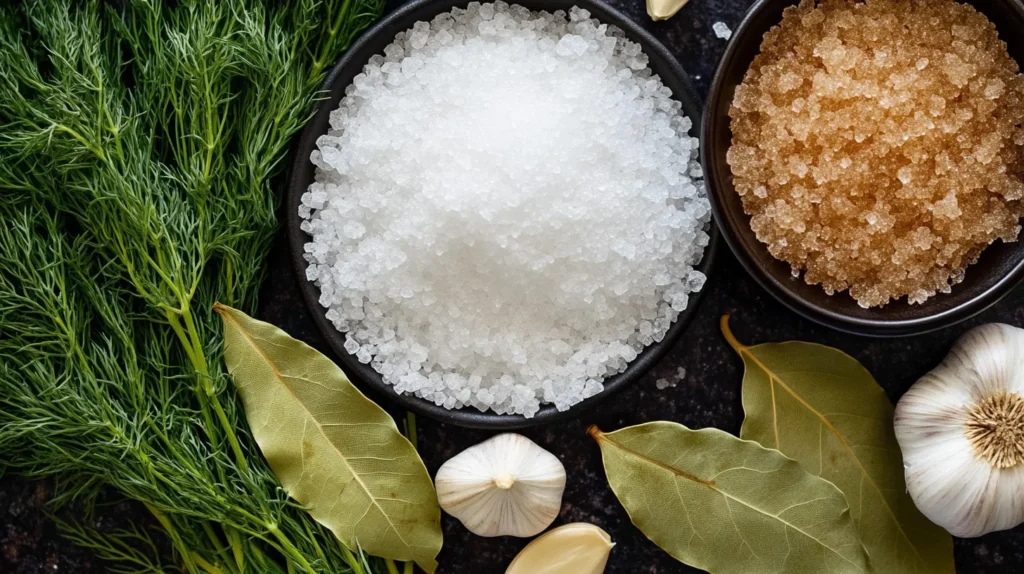
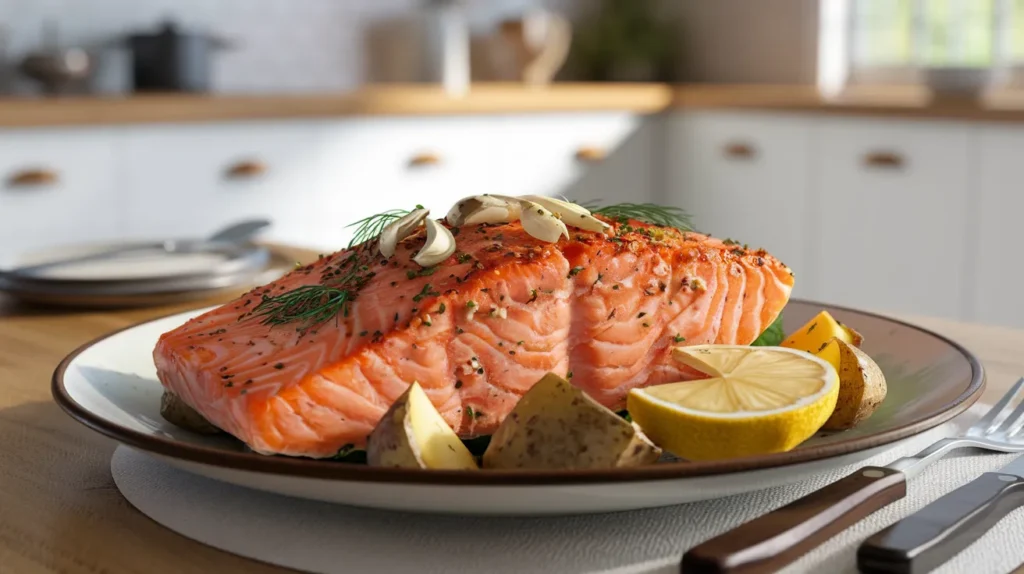
Baked Coho Salmon with Garlic and Dill

Perfect for a weeknight dinner.

  • Ingredients: Coho salmon fillets, garlic, dill, butter, and lemon slices.
  • Instructions:
  1. Preheat the oven to 375°F.
  2. Place the salmon on foil, top with garlic, dill, and butter, and wrap tightly.
  3. Bake for 15 minutes and serve with rice or roasted potatoes.

Coho Salmon Tacos: A Fresh and Flavorful Twist

Who doesn’t love tacos? This recipe is a crowd-pleaser.

  • Ingredients: Grilled Coho salmon, corn tortillas, avocado, salsa, and lime.
  • Instructions:
  1. Grill the salmon and flake it into pieces.
  2. Warm the tortillas and assemble with avocado slices, salmon, and salsa.
  3. Squeeze fresh lime juice on top and enjoy.

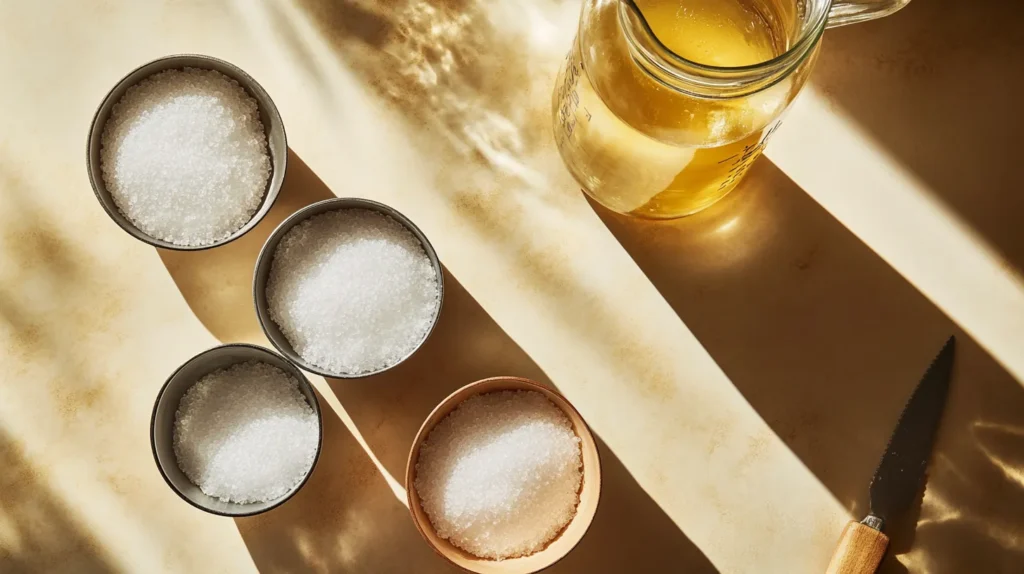
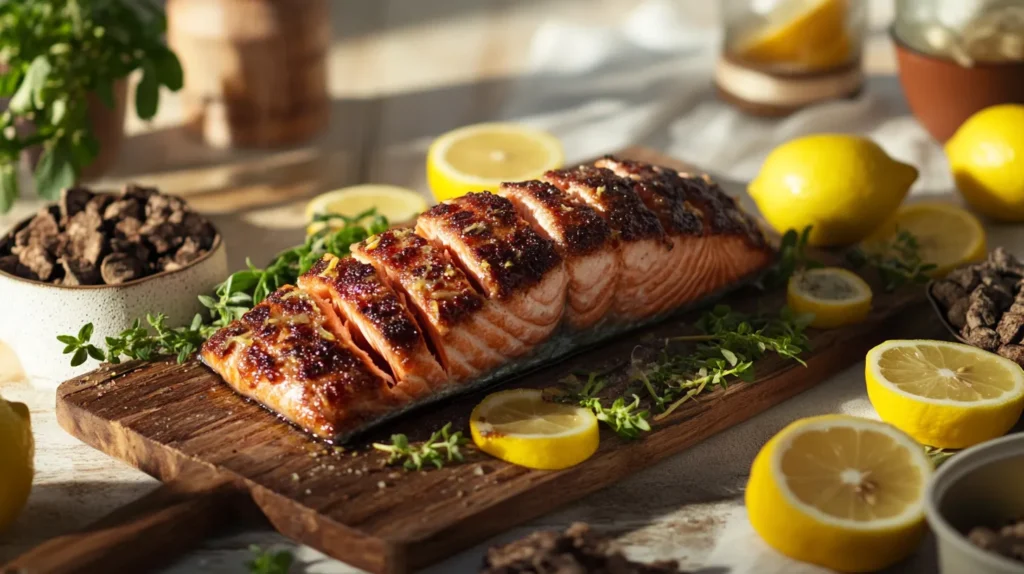
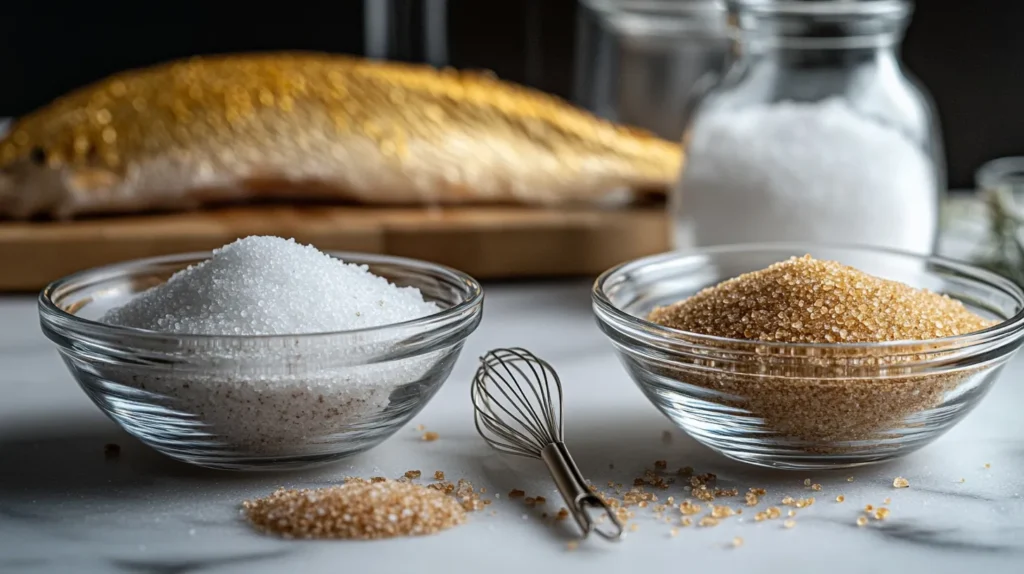
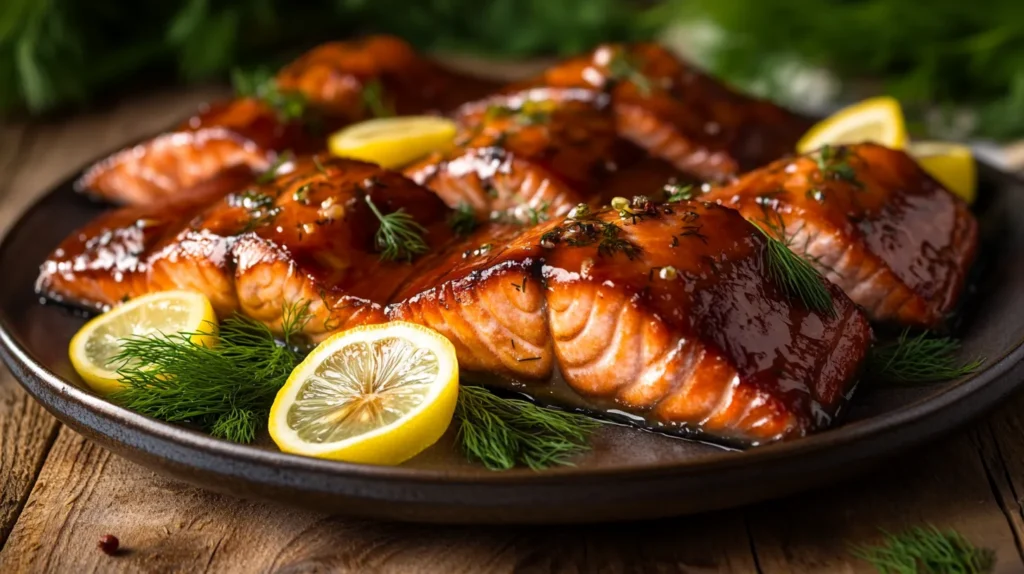
Smoked Coho Salmon: A Step-by-Step Guide

If you have a smoker, this recipe is a must-try.

  • Ingredients: Coho salmon fillets, salt, brown sugar, and your favorite wood chips.
  • Instructions:
  1. Cure the salmon with a mixture of salt and brown sugar for 4-6 hours.
  2. Rinse, pat dry, and place in a preheated smoker.
  3. Smoke for 2-3 hours at 180°F until the salmon is tender and flavorful.

Common Problems When Cooking Coho Salmon and How to Solve Them

Even though Coho salmon is relatively easy to cook, there are a few common pitfalls that can trip you up. But don’t worry! I’ve got some simple solutions to make sure your salmon turns out perfect every time.

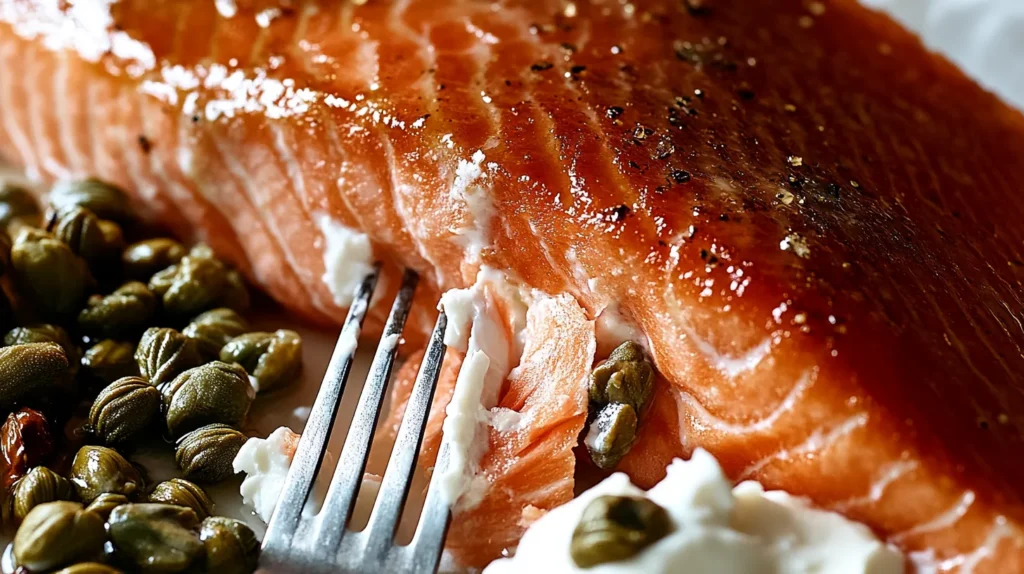
How to Avoid Overcooking

Overcooked salmon is dry and unappetizing—nobody wants that. The key is to monitor your cooking time closely.

  • Solution: Use a meat thermometer to check the internal temperature. Coho salmon is perfectly cooked when it reaches 145°F in the thickest part. If you don’t have a thermometer, look for opaque flesh that flakes easily with a fork.

“Cooking salmon is like a science experiment—timing and temperature are everything.”

Preventing a Fishy Taste

Sometimes, salmon can have a fishy odor or taste, especially if it’s not fresh.

  • Solution: Start with high-quality, fresh salmon. Marinate it in a mix of lemon juice and herbs for 30 minutes before cooking. The acidity of the lemon neutralizes the fishiness while adding flavor.

Dealing with Dryness in Cooked Salmon

Dry salmon is often the result of cooking it too long or at too high a temperature.

  • Solution: Always use a cooking method that preserves moisture, such as baking in foil or poaching. Adding a drizzle of olive oil or a pat of butter during cooking can also help keep the salmon juicy.

Pairing Coho Salmon with Sides and Drinks

Coho salmon is a versatile fish that pairs beautifully with a wide range of sides and drinks. Whether you’re planning a casual dinner or a fancy gathering, these pairings will elevate your meal.

Best Side Dishes for Coho Salmon

  1. Roasted Vegetables: Carrots, asparagus, or Brussels sprouts roasted with olive oil and garlic complement the salmon’s flavors.
  2. Rice or Quinoa: A light, fluffy grain provides a neutral base that lets the salmon shine.
  3. Salads: A fresh, crisp salad with greens, cucumber, and a tangy vinaigrette is a refreshing side.

Wine Pairings for Coho Salmon

Coho salmon’s mild flavor makes it a fantastic match for wine.

  • White Wine: Go for a crisp Sauvignon Blanc or Chardonnay to complement the fish’s richness.
  • Rosé: A dry rosé adds a fruity note that pairs well with grilled or smoked salmon.
  • Light Red Wine: If you prefer red, a Pinot Noir is an excellent choice.

“Pairing wine with salmon is like finding the perfect dance partner—when it’s right, it’s magical.”

Sustainable Sourcing of Coho Salmon

In today’s world, it’s more important than ever to choose sustainably sourced seafood. Buying sustainably caught Coho salmon helps protect fish populations and supports ethical fishing practices.

Understanding Sustainable Fishing Practices

Sustainable fishing ensures that fish are caught in ways that protect the environment and avoid overfishing. Look for certifications like the Marine Stewardship Council (MSC) label when shopping for salmon.

Tips for Buying Ethically Sourced Coho Salmon

  1. Ask Questions: Don’t hesitate to ask your fishmonger where the salmon comes from.
  2. Check Labels: Look for “wild-caught” or “sustainably farmed” on the packaging.
  3. Shop Local: Visit farmer’s markets or local seafood shops for fresh, responsibly sourced salmon.

“Choosing sustainable salmon is like casting a vote for the health of our oceans.”

Conclusion: Why Coho Salmon Should Be Your Go-To Fish

This Coho salmon cooking guide aims to inspire you to make this fish a staple in your kitchen. Whether you’re grilling it for a summer barbecue, baking it for a cozy dinner, or trying something adventurous like smoking, Coho salmon never disappoints. With its mild flavor and firm texture, it’s the perfect fish for any occasion.

So, why not make Coho salmon your go-to fish? It’s easy to cook, pairs beautifully with almost anything, and is packed with nutrients. Plus, by choosing sustainable options, you’re doing your part to protect the planet. What’s not to love?

“The next time you’re wondering what to cook, remember this: Coho salmon isn’t just food—it’s an experience.”

Creamy ditalini pasta topped with parsley on a wooden table.

The Ultimate Guide to Ditalini Pasta Recipe

Ditalini pasta styled with fresh vegetables, herbs, and olive oil.

Have you ever wondered what makes ditalini pasta so special? This tiny, tube-shaped pasta is a star in the culinary world, perfect for soups, salads, and creamy dishes. If you’ve been searching for a way to elevate your pasta game, a delicious ditalini pasta recipe is exactly what you need. In this guide, we’ll dive deep into everything you need to know about ditalini pasta, from its origins to step-by-step cooking techniques. Get ready to impress your family and friends with mouthwatering recipes!

What is Ditalini Pasta?

Origins and History of Ditalini Pasta

Ditalini pasta, which translates to “little thimbles” in Italian, has been a staple in Italian kitchens for centuries. Originally from Southern Italy, this pasta was created to be a versatile ingredient that pairs perfectly with hearty soups and broths. Picture a chilly evening in Sicily, where families would gather around a steaming bowl of minestrone, each spoonful bursting with flavor and warmth—thanks to ditalini pasta.

Why Choose Ditalini for Your Recipes?

What’s so great about ditalini pasta? Its small size makes it a winner for recipes where you want every bite to be packed with flavor. Unlike longer pasta, which can be a bit unwieldy, ditalini is easy to eat and blends beautifully with ingredients. Whether you’re making a classic Italian soup or experimenting with a new pasta salad, ditalini is the perfect choice.

“Ditalini pasta is like the Swiss Army knife of pasta—small but mighty, ready to tackle any dish you throw at it!”

Essential Ingredients for a Perfect Ditalini Dish

Choosing the Best Ditalini Pasta

Not all ditalini pasta is created equal. When shopping, look for high-quality brands made from durum wheat semolina. This type of wheat gives the pasta a firm texture that holds up well during cooking. Trust me, you don’t want your pasta turning into mush!

Key Ingredients That Enhance Flavor

To make a ditalini dish that stands out, you need more than just great pasta. Here are some ingredients that will take your dish to the next level:

  • Fresh Vegetables: Think tomatoes, zucchini, and bell peppers.
  • Aromatic Herbs: Basil, parsley, and oregano are your best friends.
  • Rich Broths or Sauces: A well-seasoned broth or creamy sauce will bring everything together.

Substitutions for Common Ingredients

Can’t find a specific ingredient? No problem! You can easily swap fresh tomatoes for canned ones or use vegetable stock instead of chicken broth if you’re cooking for vegetarians. Cooking is all about flexibility.

Ditalini pasta cooking in a pot with fresh vegetables and herbs on a countertop.

Step-by-Step Guide to Making Ditalini Pasta Recipe

Preparation: Tools and Utensils You’ll Need

Before you get started, gather your tools. You’ll need:

  • A large pot for boiling pasta
  • A colander for draining
  • A skillet or saucepan for sauces
  • A sharp knife and cutting board for prep work

Having everything ready will save you from scrambling mid-recipe. Trust me, it’s worth it.

Cooking the Perfect Ditalini Pasta

  1. Boil Water: Fill a pot with water and add a generous pinch of salt. Bring it to a rolling boil.
  2. Cook Pasta: Add the ditalini pasta and stir to prevent sticking. Cook for about 8-10 minutes, or until al dente.
  3. Drain and Rinse: Drain the pasta and rinse it with cold water if you’re making a salad. For hot dishes, reserve some pasta water to use in your sauce.

“The key to perfect pasta is timing—like catching a wave at just the right moment.”

Combining Ingredients for the Best Results

Once your pasta is cooked, it’s time to mix it with your chosen ingredients to create a mouthwatering ditalini pasta recipe. Toss the pasta with sauce in a skillet over low heat, adding a splash of pasta water for a silky texture. Trust me, this step makes all the difference.

Creamy ditalini pasta topped with parsley on a wooden table.

Classic Ditalini Pasta Soup

This hearty soup is a favorite in Italian households. Imagine a bowl filled with tender ditalini, fresh veggies, and a savory broth. Add a sprinkle of Parmesan cheese, and you’ve got a dish that feels like a warm hug.
Learn how pasta and beans are a classic pairing.

Creamy Ditalini Pasta with Cheese

Who doesn’t love a cheesy pasta dish? Cook your ditalini, then toss it in a creamy cheese sauce made with Parmesan and Gruyere. It’s comfort food at its finest.
Discover tips for making pasta and peas an unbeatable combination.

Healthy Ditalini Salad Recipes

Looking for something lighter? Combine cooked ditalini with fresh veggies, olive oil, and a splash of lemon juice. It’s perfect for a summer picnic or a quick lunch.

Common Problems When Cooking Ditalini Pasta

Let’s face it—cooking pasta isn’t always a walk in the park. Even seasoned chefs run into hiccups sometimes. But don’t worry! I’m here to help you troubleshoot the most common issues with ditalini pasta and show you how to fix them.

Overcooked or Undercooked Pasta

Have you ever ended up with pasta that’s either too mushy or too hard? It’s a common problem but one that’s easy to avoid with a bit of attention.

  • Overcooked Pasta: This happens when you leave your pasta in boiling water for too long. Overcooked ditalini loses its firm texture and turns into a soggy mess.
  • Fix: Set a timer! Check your pasta 1-2 minutes before the package instructions suggest. Bite into one piece—it should be firm yet tender (al dente).
  • Undercooked Pasta: If your ditalini is chewy and tough, it’s likely undercooked.
  • Fix: Pop it back into boiling water for another minute or two, then test again.

“Cooking pasta is all about balance—think of it like striking the perfect chord in music.”

Sauce Doesn’t Stick Properly

Nothing’s worse than making a delicious sauce only for it to slide off your pasta. This issue often boils down to how you prepare and combine your ingredients.

  • Cause: Pasta wasn’t drained properly, or the sauce is too thin.
  • Fix: Reserve some pasta water before draining—it’s packed with starch and can help bind the sauce to your pasta. When tossing the pasta with sauce, use low heat and mix thoroughly.

Bland Taste and How to Fix It

Nobody wants bland pasta, right? Here’s how to avoid that dreaded lack of flavor.

  • Cause: Not enough seasoning during cooking.
  • Fix: Always salt your pasta water—it should taste like the sea. For the sauce, don’t be shy with herbs, spices, or even a splash of vinegar or lemon juice to brighten things up.

Tips and Tricks for the Best Ditalini Pasta Recipe

Want to make your ditalini dishes shine? Here are some tried-and-true tips that will take your cooking to the next level.

Enhancing Flavor with Herbs and Spices

Herbs and spices are the unsung heroes of any great dish. Fresh basil, thyme, and parsley can make your pasta sing. And don’t underestimate the power of a pinch of red pepper flakes or freshly cracked black pepper.

  • Pro Tip: Add fresh herbs at the end of cooking to preserve their bright, aromatic flavor. For dried herbs, add them early to allow the flavors to meld.

Perfect Pairings: Side Dishes and Beverages

Ditalini pasta is versatile enough to pair with all sorts of sides and drinks. Here are some ideas:

  • Sides: Garlic bread, roasted vegetables, or a crisp Caesar salad.
  • Beverages: A glass of Chianti or a refreshing sparkling water with lemon.

“Pairing the right side dish is like finding the perfect accessory—it ties the whole look (or meal) together!”

Storage and Reheating Tips

Got leftovers? Lucky you! Here’s how to keep your ditalini pasta just as delicious the next day:

  • Storage: Place the pasta in an airtight container and refrigerate it for up to three days.
  • Reheating: For saucy dishes, reheat in a skillet with a splash of water or broth. For pasta salads, serve cold or let it come to room temperature.

Ditalini Pasta for Special Diets

Ditalini pasta isn’t just for traditional recipes. With a few tweaks, you can enjoy this delicious ingredient no matter your dietary preferences.

Gluten-Free Alternatives

If you’re avoiding gluten, don’t worry! Many brands now offer gluten-free ditalini made from rice, corn, or quinoa. The texture and flavor are so good, you might not even notice the difference.

Vegan and Vegetarian Recipe Variations

Ditalini pasta is a dream for plant-based diets. Swap out meat and dairy for ingredients like roasted vegetables, plant-based cream sauces, or legumes. For instance, try a vegan ditalini soup with chickpeas and kale—it’s hearty and delicious.

Low-Calorie and Healthy Ditalini Options

Watching your calories? No problem! Use whole-grain ditalini for added fiber, and load up on veggies to keep your dish nutritious and filling. A light tomato sauce or a drizzle of olive oil can replace heavier cream sauces.

FAQs About Ditalini Pasta

Let’s answer some of the most common questions about ditalini pasta. Whether you’re a beginner or a seasoned cook, these FAQs will help you master the art of cooking this tiny, versatile pasta.

Can I Make Ditalini Pasta from Scratch?

Absolutely! Making pasta from scratch is a fun and rewarding experience. While ditalini is a bit more challenging to shape by hand due to its small size, a pasta machine with the right attachment can do the trick. Homemade pasta has a fresh, delicate texture that’s well worth the effort.

“Think of making pasta from scratch as a culinary workout—it’s a bit of effort but oh-so-rewarding when you taste the results!”

What Are the Best Sauces for Ditalini Pasta?

Ditalini pasta works well with a wide variety of sauces, but here are some favorites:

  • Tomato-Based Sauces: A simple marinara or arrabbiata sauce complements the pasta’s texture perfectly.
  • Creamy Sauces: Alfredo or a garlic-infused bechamel pairs beautifully with ditalini for a rich, indulgent dish.
  • Light Dressings: For salads, olive oil, lemon juice, and fresh herbs are a match made in heaven.

How Long Does Ditalini Pasta Last After Cooking?

Cooked ditalini pasta can last up to three days in the refrigerator if stored in an airtight container. For longer storage, you can freeze it, but keep in mind that the texture might change slightly after reheating. Add a bit of sauce or oil before freezing to prevent it from drying out.

Conclusion: Mastering the Art of Ditalini Pasta

Congratulations, you’ve just unlocked the secrets of crafting the perfect ditalini pasta recipe! From understanding its history to mastering its cooking techniques, you’re now ready to create dishes that are as delicious as they are memorable. Remember, cooking is as much about experimentation as it is about following recipes. Don’t be afraid to try new ingredients, tweak techniques, and make each dish your own.

“Cooking is like painting—with ditalini pasta as your canvas, the possibilities are endless!”

So, what are you waiting for? Grab some ditalini pasta, gather your favorite ingredients, and start cooking up a storm. Your next culinary masterpiece is just a pot of boiling water away. Buon appetito!

Chef adjusting fish fillets in a bowl of brine solution.

What is the Recommended Ratio for Brine Cooking Smoked Fish?

Fish fillets submerged in brine with salt, sugar, and herbs.

If you’ve ever tasted perfectly smoked fish, you’ve probably wondered how it’s done. What’s the secret? It’s all in the brine. Understanding the recommended ratio for brine cooking smoked fish is crucial—it sets the stage for flavor, texture, and moisture, making your fish the star. But what’s the right brine ratio? Let’s dive into this fascinating world of brining for smoked fish and uncover the perfect formula.

Introduction:

What is Brining?

Brining is the process of soaking fish in a saltwater solution to enhance its flavor and texture. By drawing out moisture and reabsorbing it with seasoning, brining ensures your fish stays juicy and flavorful during smoking. Learn more about creating a smoked salmon brine recipe to bring out the best in your smoked dishes.

“Brining is the art of seasoning from the inside out, ensuring every bite of fish is packed with flavor.”

Why is Brining Important for Smoking Fish?

Without brining, smoked fish risks becoming dry and bland. The brine acts as a protective barrier, locking in moisture and seasoning the fish evenly. To understand the balance between salt and sugar in brining, explore the ratio of salt to brown sugar for smoking fish.

How the Right Brine Ratio Impacts Flavor and Texture

The ratio of ingredients in your brine isn’t just a number; it’s the blueprint for success. Too much salt, and you’ll have a salt bomb. Too little, and the fish won’t absorb enough flavor. The balance ensures your fish is seasoned perfectly while maintaining its natural texture.

The Standard Brine Ratio: Salt to Water

The recommended ratio for brine cooking smoked fish is 1 cup of salt to 1 gallon of water. This tried-and-true formula works for most fish types.

“Think of the brine ratio as the foundation of a house—get it right, and everything else falls into place.”

Adjusting the Ratio for Different Fish Types

Not all fish are created equal. Oily fish like salmon and mackerel can handle a stronger brine, while delicate white fish like cod or tilapia might need a gentler touch. For these, you can reduce the salt to 3/4 cup per gallon of water.

How Sugar Enhances the Brine and When to Use It

Sugar is the unsung hero of brining. It balances the saltiness and adds a subtle sweetness that complements smoked fish beautifully. A good rule of thumb is to add 1/2 cup of sugar for every 1 cup of salt. Brown sugar works wonderfully for a deeper flavor, while white sugar gives a lighter, cleaner taste.

How to Prepare the Perfect Brine for Smoked Fish

Measuring cups of salt and sugar with water for brine preparation.

Ingredients Needed for a Basic Brine

To prepare a basic brine, you’ll need:

  • 1 gallon of water
  • 1 cup of kosher salt
  • 1/2 cup of sugar (optional)
  • Optional add-ins: Bay leaves, garlic, peppercorns, or citrus zest for extra flavor

Pro Tip: “Using cold water helps the salt and sugar dissolve faster, making the process quicker and easier.”

Step-by-Step Guide to Making the Brine

  1. Dissolve the Salt and Sugar: In a large container, mix water, salt, and sugar until fully dissolved.
  2. Add Optional Ingredients: Throw in any additional flavors like herbs or spices.
  3. Submerge the Fish: Place your fish in the brine, ensuring it’s completely covered.
  4. Refrigerate: Let the fish soak in the brine for the recommended time.

Tips for Achieving the Right Balance of Saltiness

  • Taste your brine before adding the fish. If it’s too salty for your taste, dilute it with more water.
  • Use kosher salt, as it dissolves more evenly than table salt.
  • Stick to the recommended brining times to avoid over-salting.

“Perfect brining is about precision, but don’t be afraid to experiment and make it your own.”

Common Problems with Brining and Their Solutions

Chef adjusting fish fillets in a bowl of brine solution.

Brining sounds simple, but things can go wrong if you’re not careful. Don’t worry, though! With a little know-how, you can fix these issues like a pro and avoid them altogether in the future.

Overly Salty Fish: Causes and Fixes

What Went Wrong?

If your smoked fish tastes more like a salt lick than a delicacy, here’s what might have happened:

  • The brine ratio had too much salt.
  • The fish soaked in the brine for too long.
  • You didn’t rinse the fish properly after brining.

How to Fix It

  • Quick Soak: Place the fish in cold water for 30 minutes to draw out excess salt.
  • Shorter Brine Time: Next time, reduce the brining duration. For delicate fish, 2–4 hours is enough, while thicker cuts like salmon can handle 6–8 hours.
  • Adjust the Ratio: Use a milder brine with 3/4 cup of salt per gallon of water for sensitive fish.

Pro Tip: “Always set a timer when brining. Forgetting can mean the difference between perfectly seasoned and way too salty.”

Bland Flavor: How to Adjust the Brine Ratio

What Went Wrong?

Bland fish is usually the result of:

  • A weak brine ratio (too little salt or sugar).
  • Not brining long enough for the fish to absorb flavors.

How to Fix It

  • Strengthen the Brine: Stick to the standard 1 cup of salt per gallon of water and add sugar for extra depth.
  • Extend the Brining Time: If your fish didn’t sit in the brine long enough, give it more time to soak up the flavor.

“A good brine isn’t just salty—it’s flavorful, balanced, and brings out the best in your fish.”

Uneven Brining: Tips for Consistent Results

What Went Wrong?

Unevenly brined fish can happen when:

  • The fish wasn’t fully submerged in the brine.
  • The container was too small, causing crowding.

How to Fix It

  • Use a Larger Container: Make sure your fish has plenty of space to soak.
  • Weigh It Down: Place a plate or small weight on top of the fish to keep it fully submerged.
  • Stir the Brine: Occasionally stir the brine to ensure even distribution of salt and flavors.

Best Practices for Smoking Brined Fish

Now that you’ve mastered the brine, let’s talk about what comes next: preparing your fish for the smoker.

How Long Should Fish Sit in the Brine?

The brining time depends on the type of fish and its thickness:

  • Thin fillets (like trout): 2–4 hours.
  • Thicker cuts (like salmon): 6–8 hours.
  • Whole fish: 12 hours or overnight.

Pro Tip: “When in doubt, brine for a shorter time to avoid over-salting. You can always add flavor during smoking.”

Rinsing and Drying Fish After Brining

After removing the fish from the brine, it’s essential to:

  • Rinse It: Run cold water over the fish to wash off excess salt.
  • Pat It Dry: Use paper towels to remove moisture.
  • Form a Pellicle: Let the fish sit on a wire rack in a cool, dry place for about an hour. This forms a sticky layer that helps the smoke adhere.

Smoking Techniques to Enhance Brined Fish Flavor

Choose the Right Wood

The type of wood you use can make a huge difference:

  • Alder: Mild and versatile, great for salmon.
  • Hickory: Bold and smoky, ideal for stronger-flavored fish.
  • Applewood: Sweet and fruity, perfect for trout.

Monitor Temperature

Keep the smoker at a steady 175–200°F (79–93°C). This low-and-slow method ensures your fish cooks evenly and absorbs maximum flavor.

“Smoking is like a dance—slow, steady, and full of rhythm. Rushing it ruins the experience.”

Don’t Overdo It

Over-smoking can overpower the fish’s natural flavor. Start with 2–4 hours, depending on the size and type of fish, and adjust as needed.

Frequently Asked Questions About Brine Ratios

Got questions about brining? You’re not alone! Let’s tackle some of the most common queries so you can feel confident every step of the way.

Can You Over-Brine Fish?

Yes, you can. Over-brining happens when fish sits in the brine for too long, making it overly salty or mushy. Always follow recommended brining times based on the type and thickness of the fish. If in doubt, brine for a shorter time and adjust in future attempts.

What’s the Best Ratio for Sweet vs. Savory Brines?

For a savory brine, stick to the classic 1 cup of salt per gallon of water. To balance it with sweetness, add 1/2 cup of sugar. For a sweeter brine, increase the sugar to match the salt, creating a 1:1 ratio. This works beautifully for salmon or trout if you’re after a more candied flavor profile.

“Think of sweet brines as a way to add a little dessert-like flair to your savory masterpiece.”

How Does Brine Ratio Change for Hot vs. Cold Smoking?

Hot smoking and cold smoking both benefit from brining, but the ratio remains largely the same. The difference lies in the technique:

  • Hot Smoking: Requires a shorter smoking time, so the brine should be well-balanced for quick flavor absorption.
  • Cold Smoking: Involves longer smoking times, so the fish needs a robust brine to maintain moisture and flavor over extended exposure to smoke.

Conclusion: Mastering the Art of Brining Smoked Fish

Key Takeaways on Brine Ratios for Smoked Fish

By now, you’ve learned that the recommended brine ratio is your golden ticket to smoked fish perfection. Stick to the 1 cup of salt per gallon of water rule, adjust based on your preferences, and don’t be afraid to experiment with sugar, spices, and herbs.

  • Brining is essential for flavor, texture, and moisture.
  • The right ratio depends on the fish type and your desired taste.
  • Rinsing and drying the fish after brining are crucial steps.

“Perfect smoked fish isn’t just about technique; it’s about passion, precision, and a little bit of experimentation.”

Tips for Experimenting with Your Own Brine Recipes

  • Start with the basic ratio and tweak it to suit your preferences.
  • Add ingredients like garlic, citrus, or spices to create unique flavor profiles.
  • Always taste-test your brine before submerging the fish.

Final Words

Brining is the heart and soul of smoked fish. Whether you’re preparing salmon, trout, or any other fish, the recommended brine ratio ensures consistent, delicious results. Now that you’re armed with all this knowledge, it’s time to roll up your sleeves, mix up that brine, and create a smoked fish masterpiece that’ll impress everyone at the table.

Let me know if you’d like more detailed recipes, advice on smoking techniques, or tips for enhancing your brine. The world of smoked fish is waiting for you!

Smoked fish fillets on a rack in a smoker with wood chips.

Do You Rinse Brine Off Fish Before Smoking?

Smoked salmon fillet on a wooden board with herbs and lemon.

If you’ve ever tried smoking fish and wondered, ‘Do you rinse brine off fish before smoking?’ you’re not alone. It’s a question many smoking enthusiasts grapple with, and the answer might surprise you. This question can spark a lively debate among food enthusiasts and smoking aficionados. But don’t worry, we’re here to break it all down for you. Let’s dive into everything you need to know about brining, rinsing, and achieving that perfect smoked fish.

Understanding the Basics of Fish Brining and Smoking

Fish fillets submerged in a brine solution in a glass bowl.

Why Do You Rinse Brine Off Fish Before Smoking?

Brining is like giving your fish a flavorful bath. It’s a mix of salt, water, and sometimes sugar or spices, which works to infuse the fish with flavor and keep it juicy during the smoking process. Without brining, your fish might end up dry, bland, or—let’s face it—a little boring.

Why does it work? Salt helps to draw moisture out of the fish, but it also makes the flesh absorb water from the brine. This process creates a balance that keeps the fish moist and tasty even when exposed to the heat of smoking.

Benefits of Brining Fish Before Smoking

Think of brining as the superhero cape for your fish. It:

  • Enhances flavor with salt and spices penetrating deep into the fish.
  • Improves texture, making the fish firm and succulent.
  • Reduces the risk of your fish drying out during smoking.

Common Types of Brines Used for Fish Smoking

There’s no one-size-fits-all for brines. Here are a few popular options:

  • Simple Salt Brine: Water, salt, and sugar—straightforward but effective.
  • Herb-Infused Brine: Add herbs like dill, rosemary, or thyme for extra flair.
  • Citrus Brine: A splash of lemon or orange juice brings a fresh, tangy kick.

“Brining is not just a step—it’s the secret handshake between you and perfectly smoked fish.”

The Importance of Rinsing Brine Before Smoking

What Happens If You Don’t Rinse Brine Off Fish?

Skipping the rinse might leave your fish too salty. No one wants to bite into their smoked salmon and feel like they’ve licked a salt shaker! Rinsing helps remove the excess salt and creates a balanced flavor.

How Rinsing Affects the Smoking Process and Final Flavor

Rinsing isn’t just about taste. Leaving too much brine can create a sticky surface that affects the smoking process. By rinsing, you ensure the smoke can evenly flavor the fish, resulting in that beautiful, smoky taste we all love.

The Science Behind Rinsing Brine: Salt and Flavor Balance

Here’s the deal: when you rinse, you’re not washing away the brine’s work. The salt and flavors have already penetrated the fish’s flesh, so rinsing just removes the surface salt, ensuring the flavor is perfect—not overpowering.

“Think of rinsing as fine-tuning your fish. It’s the last step before the spotlight hits.”

Step-by-Step Guide: Preparing Fish for Smoking

Selecting the Right Fish for Smoking

Start with fresh fish. Salmon, trout, mackerel, and whitefish are popular choices because of their texture and flavor. Fresh fish smells clean, has bright eyes, and firm flesh.

Creating the Perfect Brine for Your Fish

Whip up your brine by combining:

  • 4 cups of water
  • 1/4 cup of kosher salt
  • 1/4 cup of brown sugar

Feel free to add extras like garlic, peppercorns, or herbs. Mix until the salt and sugar dissolve.

How Long Should Fish Sit in Brine?

Timing is everything. For thin fish fillets, 2-4 hours is enough. For thicker cuts like salmon steaks, aim for 6-8 hours. Over-brining can make the fish overly salty, so don’t go overboard.

Pro Tip: “Set a timer! Forgetting your fish in the brine can turn your masterpiece into a salty mess.”

Rinsing Techniques: Best Practices for Fish Smoking

Cook rinsing fish fillets under cold water in a kitchen sink.

Now that you understand why brining is essential, let’s tackle the next big question: how do you rinse your fish after brining without undoing all that flavor magic? It’s a delicate balance, but with the right techniques, you’ll be a pro in no time.

How to Properly Rinse Fish After Brining

Step 1: Rinse Under Cold Water

After your fish has soaked up the brine, remove it from the mixture and give it a gentle rinse under cold running water. Cold water helps wash off the excess surface salt without affecting the brine’s flavor inside the fish.

After brining, the question often arises: Do you rinse brine off fish before smoking? The answer is yes. Rinsing ensures you remove excess salt while keeping the deep flavors intact.

“Think of rinsing as the finishing touch, not a redo. You’re simply polishing what’s already perfect.”

Step 2: Use a Light Hand

Be gentle! Fish is delicate, especially after brining. Avoid scrubbing or rough handling that could damage the fillets.

Step 3: Pat It Dry

After rinsing, pat your fish dry with paper towels. This step is critical because wet fish won’t form the pellicle—a thin, sticky layer that smoke clings to during the smoking process.

Do You Need to Pat Fish Dry After Rinsing?

Absolutely. Drying your fish isn’t just a nice-to-have; it’s a must. Without proper drying, your fish won’t absorb the smoky flavor evenly. Let the fish sit on a wire rack in a cool, dry place for about an hour. You’ll know it’s ready when the surface feels tacky to the touch.

When to Skip Rinsing: Special Cases and Recipes

In some recipes, you might skip rinsing altogether—like when you’re going for a heavily salted style. However, these are exceptions, not the rule. For most smoked fish, rinsing ensures balance.

“Skipping the rinse is like leaving salt on your fries after pouring the whole shaker—it’s overkill!”

Common Problems When Smoking Brined Fish and How to Solve Them

Smoked fish fillets on a rack in a smoker with wood chips.

Smoking fish can feel like a science experiment, and sometimes things don’t go as planned. Let’s tackle the most common issues and how to fix them.

Overly Salty Fish: Causes and Remedies

What Went Wrong?

If your fish tastes like it came straight from the ocean, a few things could be to blame:

  • Brined for too long.
  • Didn’t rinse after brining.
  • Brine recipe was too salty.

How to Fix It

  • Prevention: Stick to recommended brining times and rinse thoroughly.
  • Quick Fix: Soak the fish in cold water for 30 minutes before smoking. This can help draw out some of the excess salt.

Uneven Smoking: Tips for Consistent Results

What Went Wrong?

  • Fish wasn’t dried properly after rinsing.
  • Inconsistent heat in the smoker.
  • Uneven placement of fish in the smoker.

How to Fix It

  • Always dry the fish before smoking.
  • Use a smoker with a reliable heat source and monitor the temperature closely.
  • Arrange the fish evenly on the rack with enough space for smoke to circulate.

Pro Tip: “A thermometer is your best friend. Keep that temperature steady like a cruise control setting on a long drive.”

Loss of Flavor: How Rinsing Plays a Role

What Went Wrong?

  • Didn’t let the brine soak long enough.
  • Over-rinsed the fish.
  • Used a weak brine recipe.

How to Fix It

  • Make sure the brine recipe is well-balanced.
  • Don’t skimp on brining time, but don’t overdo it either.
  • Rinse lightly to remove surface salt, not the flavor embedded inside.

Expert Tips for Perfectly Smoked Fish Every Time

Adjusting Brine Recipes to Personal Taste

The beauty of brining is that it’s customizable. Want a sweeter profile? Add honey or brown sugar. Craving spice? Toss in chili flakes or black pepper.

Choosing the Best Smoking Wood for Your Fish

Different woods create unique flavors.

  • Alder: Subtle and light, perfect for salmon.
  • Hickory: Bold and smoky, great for mackerel.
  • Applewood: Sweet and fruity, ideal for trout.

Monitoring Temperature and Timing During Smoking

Keep the smoker temperature between 175–200°F (79–93°C). Smoking times vary, but generally, fish takes about 2-4 hours, depending on thickness.

“Patience is key. Smoking fish is more like slow dancing than a quick sprint.”

FAQs: Rinsing Brine and Smoking Fish

Let’s tackle some of the most frequently asked questions about brining and rinsing fish before smoking. Whether you’re a first-timer or a seasoned pro, these answers will help clear up any lingering doubts.

Do you rinse brine off fish before smoking?

Yes, always! This step prevents your smoked fish from becoming overly salty while letting the brine work its magic inside.

What Other Ingredients Can Enhance the Brine?

The possibilities are endless! Here are some ideas to elevate your brine:

  • Citrus Zest: Adds a refreshing, tangy flavor.
  • Bay Leaves: Subtle herbal notes for a gourmet touch.
  • Ginger: Perfect for an Asian-inspired flavor profile.
  • Whiskey or Rum: A splash adds depth and complexity.

Pro Tip: “Experimenting with brine ingredients is like creating your own signature dish—don’t be afraid to get creative!”

How to Store Smoked Fish for Best Quality

Smoked fish can last for a week in the fridge or up to two months in the freezer if stored properly. Use an airtight container to keep the fish fresh and flavorful.

“Think of smoked fish as a treasure—store it well, and it’ll reward you with its taste every time.”

Conclusion: Achieving the Perfect Smoked Fish

The Role of Rinsing Brine in Fish Smoking

By now, you know that rinsing is more than just a step—it’s a game-changer. It balances flavor, ensures even smoking, and sets the stage for your fish to shine.

Key Takeaways for Brining and Smoking Success

  • Always brine your fish for flavor and moisture.
  • Rinse lightly to remove excess salt, but keep the core flavors intact.
  • Pat the fish dry and let it form a pellicle for that perfect smoky finish.
  • Monitor your smoker’s temperature and timing like a hawk.

For additional tips on brining and smoking techniques, delve into what is the ratio of salt to brown sugar for smoking fish and smoked salmon brine recipe.

“Smoking fish isn’t just cooking—it’s crafting a masterpiece that delights the senses.”

Final Words

Smoking fish can feel intimidating at first, but once you understand the role of brining and rinsing, it becomes a fun and rewarding process. So, grab your favorite fish, prepare your brine, and fire up that smoker. You’re about to create something amazing!

Let me know if you’d like help refining your smoking technique or exploring more recipes to try. The smoked fish world is your oyster—or should we say, your salmon!

Fish fillet submerged in brine with spices like bay leaves and peppercorns.

What is the Ratio of Salt to Brown Sugar for Smoking Fish?

Smoked salmon fillet with fresh dill and lemon slices on a wooden board.

Smoking fish is an art, and the secret lies in mastering the perfect salt-to-brown sugar ratio for smoking fish to achieve the best results. Whether you’re a seasoned pitmaster or just starting your journey into the world of smoked fish, there’s one key question that often arises: What’s the perfect ratio of salt to brown sugar for smoking fish? Don’t worry—by the end of this article, you’ll be a pro at balancing these flavors to create perfectly smoked, mouthwatering fish. Let’s dive in!

Introduction

Smoking fish isn’t just about preserving it; it’s about creating layers of flavor that transform simple seafood into a gourmet delight. Ever wondered why smoked salmon or mackerel tastes so rich and savory? It’s the magic of the brine, the smoke, and the love you pour into the process.

Whether you’re preserving or flavoring, understanding the salt-to-brown sugar ratio for smoking fish is a crucial step for success. Originally, it was used to preserve fish for long journeys or harsh winters. These days, it’s more about the taste. Smoking gives fish a deep, smoky flavor that’s hard to resist. Plus, it’s a healthier cooking method since it doesn’t require oil or frying.

If you’re brining salmon, check out our guide on how long you should brine salmon for for tips tailored to this popular fish.

The Role of Salt and Brown Sugar in Smoking Fish

Kosher salt and brown sugar in glass bowls with a fish fillet on a marble counter.

Here’s the deal: salt and brown sugar aren’t just there for flavor. They’re the heroes of the brining process. Salt draws out moisture from the fish, making it firmer and helping it absorb the smoky flavor. Meanwhile, brown sugar adds sweetness and balances out the saltiness, creating that perfect harmony of flavors.

“Salt preserves, and sugar balances—that’s the golden rule of smoking fish!”

Understanding the Basics of Brining

Fish fillet submerged in brine with spices like bay leaves and peppercorns.

To achieve the right salt-to-brown sugar ratio for smoking fish, understanding the basics of brining is crucial. This step is essential. Skipping it is like baking a cake without preheating the oven—it just doesn’t work.

What is Brining?

Brining is soaking fish in a mixture of salt, sugar, and sometimes spices. Think of it as marinating, but for smoking. It’s what gives your fish its amazing flavor and texture. Brining also prevents the fish from drying out during the smoking process. Trust me, once you start brining, you’ll never skip this step again.

How Brining Affects the Flavor and Texture of Fish

Ever tasted smoked fish that was too salty or bland? That’s a result of an unbalanced brine. A good brine doesn’t just season the fish; it enhances its natural flavors. It also changes the fish’s texture, making it firm yet moist. You’ll know you’ve nailed it when your smoked fish has that perfect bite—tender, flavorful, and just smoky enough.

Key Ingredients in a Brine for Smoking Fish

At its core, a basic brine needs only three ingredients:

  1. Salt: Use kosher salt or sea salt for the best results. Avoid table salt; it’s too fine and can make your brine overly salty.
  2. Brown Sugar: The molasses in brown sugar adds depth and sweetness. You can use light or dark brown sugar depending on your taste.
  3. Water: This is the base of your brine. Clean, filtered water works best.

You can also add spices like black pepper, garlic, or bay leaves for extra flavor. Want a little heat? Toss in some crushed red pepper flakes.

The Ideal Salt-to-Brown Sugar Ratio for Smoking Fish

Now for the main event—the ratio. Get this right, and you’re halfway to smoked fish heaven.

Standard Ratio: A Proven Formula

The standard ratio for a fish brine is 2 parts salt to 1 part brown sugar. For example:

  • 1 cup of kosher salt
  • ½ cup of brown sugar
  • 4 cups of water

This ratio works for most fish types, from salmon to trout. It’s balanced enough to season the fish without overpowering it.

Adjusting the Ratio Based on Taste Preferences

Not everyone likes their fish the same way. Some prefer it saltier, while others love a touch of sweetness. You can tweak the ratio to suit your taste:

  • For a sweeter brine: Use equal parts salt and brown sugar.
  • For a saltier brine: Stick to the 2:1 ratio or increase the salt slightly.

Remember, small adjustments can make a big difference, so start with the basics and experiment from there.

“A little tweak here, a little tweak there—that’s how you find your perfect brine.” 🎣

Common Mistakes When Measuring the Ratio

Mistakes happen, but some are easier to fix than others. Here are a few to watch out for:

  • Using table salt: Its fine texture means you’ll end up with way too much salt in your brine.
  • Skipping the sugar: Without sugar, your fish will be overly salty and lack depth of flavor.
  • Eyeballing the measurements: Precision matters here. Use measuring cups for consistent results.

How to Prepare a Perfect Brine for Smoking Fish

Alright, now that you know the magic ratio and the role of salt and sugar, it’s time to roll up your sleeves and make the brine. This step is where you set the stage for smoky perfection.

Step-by-Step Guide to Making a Brine

Making a brine is simple, but you’ve got to get it right. Here’s a foolproof guide:

  1. Measure Your Ingredients
    Start with the standard ratio: 1 cup of kosher salt, ½ cup of brown sugar, and 4 cups of water. Feel free to scale up if you’re brining a larger batch of fish.
  2. Dissolve Salt and Sugar in Water
    In a large mixing bowl, combine the salt and brown sugar. Add warm water and stir until everything dissolves. Warm water works faster, but make sure it cools down before you add the fish.
  3. Add Optional Flavors
    Want to add a personal touch? Toss in spices, herbs, or aromatics like garlic cloves, bay leaves, or black peppercorns. These little extras can elevate your brine.
  4. Submerge the Fish
    Place your fish in the brine, ensuring it’s fully submerged. If it floats, weigh it down with a small plate.
  5. Refrigerate and Wait
    Cover the bowl and refrigerate for 6–12 hours, depending on the thickness of the fish. Thin fillets like trout might only need a few hours, while salmon steaks benefit from the full 12 hours.

“Patience is the secret ingredient in every great brine. Give it time to work its magic!”

Tips for Selecting the Right Salt and Brown Sugar

Not all salts and sugars are created equal. Here’s what you need to know:

  • Kosher Salt: Its coarse texture dissolves evenly and avoids over-salting.
  • Sea Salt: A great alternative if you want a slightly different mineral flavor.
  • Brown Sugar: Light or dark? Light brown sugar gives a mild sweetness, while dark adds a richer, molasses-like depth.

Avoid iodized table salt—it’s too fine and can introduce a metallic taste. Stick to the tried-and-true basics for the best results.

Enhancing the Brine with Additional Flavors

Why stop at salt and sugar? Get creative!

  • For a citrusy twist: Add orange or lemon zest.
  • For a spicy kick: Include crushed red pepper flakes or cayenne pepper.
  • For herbal notes: Toss in thyme, rosemary, or dill.

While the classic brine is a reliable foundation, adding aromatics like garlic, peppercorns, or citrus zest can elevate your brine. Need more inspiration? Discover how smoked salmon pairs beautifully in different dishes, like in this creative salmon rice bowl recipe.

Techniques for Smoking Fish After Brining

Now that your fish is brined to perfection, it’s time to move on to the main event—smoking. But hold on, there’s more prep involved to ensure your fish comes out smoky, tender, and flavorful.

Cold Smoking vs. Hot Smoking: Which Method Works Best?

There are two main methods for smoking fish, and the choice depends on your taste preferences:

  • Cold Smoking:
    This method smokes the fish at a low temperature (under 85°F). It’s great for fish like salmon, giving it a delicate, silky texture. However, it requires more time and precision.
  • Hot Smoking:
    Hot smoking cooks the fish at higher temperatures (175–225°F). It’s quicker and gives the fish a flakier texture. Perfect for hearty fish like trout or mackerel.

Not sure which to choose? Think about how you plan to eat the fish. For snacking or appetizers, go cold. For meals, hot smoking is your best bet.

Preparing the Fish for Smoking

Prepping the fish is just as important as the smoking process. Follow these steps for success:

  1. Rinse and Pat Dry: After brining, rinse the fish under cold water to remove excess salt and sugar. Then pat it dry with paper towels.
  2. Form the Pellicle: This is a thin, tacky layer that forms on the fish’s surface when it’s left to air dry. It helps the smoke adhere better. Place the fish on a rack in a cool, breezy spot for 1–2 hours.
  3. Season (Optional): If you want extra flavor, sprinkle on some dry seasonings like black pepper or paprika.

Monitoring the Smoking Process

Smoking fish isn’t a “set it and forget it” task. Here’s what you need to do:

  • Keep an Eye on Temperature: Use a smoker thermometer to maintain a consistent heat level.
  • Check the Fish Regularly: Look for signs that it’s done—opaque flesh, flaky texture, and a golden color.
  • Don’t Overdo It: Over-smoking can make the fish bitter. Stick to the recommended times (usually 2–4 hours for hot smoking).

“Smoking fish is a labor of love. Treat it like art, not a chore.” 🎨

Troubleshooting Common Problems in Fish Smoking

Let’s face it: even seasoned pros run into issues. Here’s how to fix some common problems.

Overly Salty Fish: Causes and Fixes

Did your fish come out too salty? It happens. Here’s why and how to fix it:

  • Cause: The brine was too strong or the fish brined for too long.
  • Fix: Next time, dilute your brine or shorten the brining time. To salvage salty fish, soak it in cold water for 30–60 minutes before smoking.

Uneven Flavor Distribution in the Fish

Nothing’s worse than fish that’s salty in one bite and bland in the next. This usually happens if the fish wasn’t fully submerged in the brine. Make sure to weigh it down and stir the brine occasionally.

How to Prevent the Fish from Drying Out

Dry fish is a smoker’s nightmare. Here’s how to avoid it:

  • Brine Properly: Brining locks in moisture.
  • Don’t Overcook: Keep an eye on the smoker’s temperature and the fish’s internal temperature (145°F is perfect).
  • Use a Water Pan: Placing a pan of water in the smoker can help maintain humidity.

Health Benefits and Considerations of Smoked Fish

Smoked fish isn’t just a treat for your taste buds—it’s good for your body too! Packed with nutrients and bursting with flavor, smoked fish can be a healthy addition to your diet. But like everything, it comes with a few caveats. Let’s explore both sides of the plate.

Nutritional Benefits of Smoking Fish

Fish is already a superstar when it comes to nutrition, and smoking doesn’t change that. Here’s why you should feel good about indulging in smoked fish:

  • Rich in Omega-3 Fatty Acids: These healthy fats boost brain function, reduce inflammation, and support heart health. Salmon and mackerel are especially high in omega-3s.
  • High-Quality Protein: Fish provides lean protein, perfect for muscle building and repair.
  • Packed with Vitamins and Minerals: Think vitamin D, B12, selenium, and more—these nutrients play vital roles in energy, immunity, and overall health.

“Smoked fish isn’t just a meal; it’s a health booster wrapped in deliciousness!” 🐟

Potential Risks of Consuming Smoked Fish

As wonderful as smoked fish is, moderation is key. Here’s why:

  • Sodium Content: Brining adds salt, which can be an issue if you’re on a low-sodium diet.
  • Preservatives in Store-Bought Options: Some commercially smoked fish contains additives that might not be the healthiest choice.
  • Smoking-Related Compounds: Over-smoking can create compounds that, in excess, might not be great for your health. Stick to recommended smoking times and temperatures.

The takeaway? When prepared properly and eaten in moderation, smoked fish is a fantastic, nutrient-dense food.

Frequently Asked Questions About Smoking Fish

We get it—you’ve got questions. Let’s tackle the most common ones so you can smoke fish with confidence.

Can I Use Other Types of Sugar in the Brine?

Absolutely! While brown sugar is the go-to for its depth of flavor, you can experiment with:

  • Honey or Maple Syrup: These add a unique sweetness and a hint of natural flavor.
  • White Sugar: A simpler sweetness if that’s all you have on hand.
  • Coconut Sugar: For a slightly nutty, caramelized taste.

Just keep in mind that different sugars can alter the final flavor, so test in small batches first.

What Type of Fish Works Best for Smoking?

While you can technically smoke any fish, some varieties shine more than others:

  • Salmon: A classic choice, loved for its rich, fatty texture.
  • Trout: Mild and tender, perfect for beginners.
  • Mackerel: Bold, oily, and ideal for hot smoking.
  • Cod or Haddock: Great for a milder, flakier result.

Pro Tip: Fresh fish is always the best option. Frozen fish works too, but make sure it’s fully thawed and patted dry before brining.

H3: How Long Should Fish Be Brined Before Smoking?

The brining time depends on the thickness of the fish:

  • Thin Fillets (e.g., trout): 4–6 hours.
  • Medium Cuts (e.g., mackerel): 8–10 hours.
  • Thick Cuts (e.g., salmon steaks): 12 hours.

If you’re short on time, you can brine for as little as 2 hours, but the flavors won’t be as pronounced.

Conclusion: Mastering the Art of Smoking Fish

By now, you’ve got everything you need to start smoking fish like a pro. From understanding the perfect salt-to-brown sugar ratio to mastering the brining and smoking process, you’re well on your way to creating fish that’s tender, flavorful, and smoky in all the right ways.

Recap of the Salt-to-Brown Sugar Ratio

Remember, the standard ratio is 2 parts salt to 1 part brown sugar. It’s simple, effective, and easy to tweak based on your preferences. Whether you like it sweeter or saltier, this ratio is your foundation.

Encouragement to Experiment and Personalize

Smoking fish is as much about creativity as it is about technique. Don’t be afraid to experiment! Try new spices, play with smoking times, and make the process your own.

“Smoking fish isn’t just cooking—it’s crafting flavor, sharing joy, and creating memories.” 🎣✨

Now, it’s time to fire up that smoker, gather your ingredients, and start your smoking adventure. Happy smoking!

Recipe for Banana Bread Without Flour

Flourless banana bread on a wooden table with bananas and honey.

If you’ve been searching for the ultimate recipe for banana bread no flour, you’re in the right place! This recipe for banana bread with no flour is not only simple but also incredibly healthy. Imagine a loaf that’s moist, packed with flavor, and entirely gluten-free. Ready to dive in? Let’s uncover the secrets behind this delightful treat.

Why Choose a Flourless Banana Bread?

The Health Benefits of Going Flourless

Did you know that flourless banana bread is naturally gluten-free and often lower in carbs? This recipe for banana bread no flour is ideal for those following a gluten-free lifestyle.. Plus, skipping the flour often means fewer processed ingredients, which is a win for your health. It’s like giving your body a clean, fresh start every time you take a bite. 🌱

Perfect for Gluten-Free and Low-Carb Diets

Are you gluten-intolerant or trying to cut down on carbs? Flourless banana bread checks all the boxes. It’s a guilt-free option for those with dietary restrictions. You’ll still get the same comforting flavor and texture without compromising your health goals.

Common Misconceptions About Flourless Baking

“But won’t it taste weird without flour?” Nope! That’s a myth. In fact, many people can’t even tell the difference. The bananas do all the magic by adding natural sweetness and structure. Once you try it, you’ll wonder why you ever used flour in the first place.

Flourless banana bread is not only gluten-free but also lower in carbs, making it ideal for those on specific dietary paths. For instance, if you’re exploring alternatives to traditional baking, check out Can you use bananas instead of flour? for a detailed guide on using bananas creatively.

“Sometimes, the best recipes are born when we leave out the obvious and embrace the creative.”

Essential Ingredients for Flourless Banana Bread

Overripe bananas and almond flour for flourless banana bread.

Choosing the Right Bananas

Choosing the right bananas is crucial when preparing a recipe for banana bread no flour Overripe bananas with plenty of brown spots are ideal. Why? They’re sweeter, softer, and mash easily, giving your bread that rich, moist texture.

Substitutes for Traditional Flour

Here’s where things get interesting. Instead of flour, you’ll use alternatives like almond flour, oat flour, or even blended oats. These swaps not only keep the recipe gluten-free but also add a nutty, wholesome flavor.

Adding Natural Sweeteners

Want to keep it healthy? Opt for natural sweeteners like honey, maple syrup, or coconut sugar. These add just the right amount of sweetness without overpowering the banana flavor.

Need substitutes for bananas? See What can I use if I don’t have enough bananas for banana bread? for great ideas.

Optional Mix-Ins for Extra Flavor

Here’s your chance to get creative. Think dark chocolate chips, chopped walnuts, or even shredded coconut. These extras add texture and a touch of indulgence. Pro tip: A sprinkle of cinnamon or a dash of vanilla extract will take your bread to the next level. ✨

Step-by-Step Guide to Making Flourless Banana Bread

Flourless banana bread batter in a mixing bowl with a whisk.

Preparing the Ingredients

First things first—get your ingredients ready. Mash those bananas like you mean it! You’ll want about three medium-sized bananas for the perfect balance of moisture and flavor.

Mixing Techniques for a Smooth Batter

Grab a bowl and mix your wet ingredients: mashed bananas, eggs, and your chosen sweetener. Slowly fold in the dry ingredients, like almond flour or blended oats. Stir gently until you have a smooth, lump-free batter. Easy peasy, right?

“Baking is like a dance—follow the rhythm, and you’ll create magic.”

Baking Tips for Perfect Results

Preheat your oven to 350°F (175°C) and line your loaf pan with parchment paper. Pour the batter in and spread it evenly. Bake for about 45-50 minutes, or until a toothpick comes out clean. Your kitchen will smell like heaven—promise! 😍

Common Problems and Solutions in Flourless Baking

Let’s face it, even the best bakers run into issues sometimes. Flourless banana bread can be a bit tricky, but don’t worry—I’ve got you covered with some easy fixes. Ready? Let’s troubleshoot! 🛠️

Why Did My Banana Bread Turn Out Too Dense?

This is a common problem, and it usually happens when the batter is overmixed. Remember, flourless recipes rely on the natural starches in the ingredients (like bananas or almond flour). Overmixing can break down these starches and make the batter heavy.

Solution: Mix the batter gently. As soon as the ingredients are combined, stop stirring. Think of it as folding a soft blanket—careful, but effective.

How to Avoid a Sticky Texture

A sticky texture can be disappointing, right? This happens when there’s too much moisture in the batter or if the bread is undercooked.

Solution: Use precise measurements for the bananas and wet ingredients. If your bread still feels sticky after baking, pop it back into the oven for an extra 5–10 minutes. Check with a toothpick—it should come out clean!

Preventing the Bread from Falling Apart

No one wants crumbly banana bread. Without flour, the bread’s structure depends on eggs and alternative flours. Missing the balance can result in a loaf that falls apart.

Solution: Add an extra egg if your batter feels too loose. Alternatively, mix in a tablespoon of flaxseed meal or chia seeds to bind everything together.

Variations of Flourless Banana Bread

Who says you have to stick to the classic recipe? Let’s get creative with some fun and delicious variations. 🎨

Vegan-Friendly Recipe Adjustments

Want to make your banana bread vegan? Easy peasy. Replace eggs with flaxseed eggs (1 tablespoon of flaxseed meal mixed with 3 tablespoons of water for each egg). Swap honey for maple syrup, and you’ve got a plant-based masterpiece!

Low-Carb and Keto-Friendly Versions

For those watching carbs, almond flour is your best friend. Use a low-carb sweetener like erythritol or stevia, and skip sugary mix-ins like chocolate chips. Your keto-friendly banana bread will be just as satisfying without the sugar rush.

Chocolate and Nut Variations

Let’s add some pizzazz! Dark chocolate chips, crushed pecans, or even a swirl of peanut butter can take your banana bread to a whole new level. Want a tropical twist? Add some shredded coconut and a splash of pineapple juice. 🍍

Storing and Serving Tips for Flourless Banana Bread

You’ve baked your masterpiece—now what? Here’s how to keep it fresh and make every slice as delicious as the first.

How to Keep Banana Bread Fresh Longer

Store your banana bread in an airtight container at room temperature for up to 3 days. If you want it to last longer, pop it in the fridge. Pro tip: Wrap it tightly in plastic wrap before refrigerating to lock in moisture.

Creative Ways to Serve Your Banana Bread

Banana bread isn’t just for breakfast. Warm up a slice and top it with a dollop of Greek yogurt and a drizzle of honey for a fancy dessert. Or spread on some almond butter for a satisfying snack. Feeling adventurous? Use two slices to make a banana bread sandwich. Yep, it’s as amazing as it sounds. 🥪

“Great banana bread doesn’t just feed your stomach—it feeds your soul.”

Nutritional Information for Flourless Banana Bread

Let’s talk about the health perks of this delightful treat. Flourless banana bread isn’t just delicious—it’s also packed with nutrients that make it a guilt-free indulgence.

Calories and Macronutrient Breakdown

A standard slice of flourless banana bread typically contains around 150-200 calories, depending on the ingredients you use. It’s higher in healthy fats (thanks to almond flour or nuts) and lower in carbs than traditional banana bread. You’ll also get a good dose of fiber, which helps keep you full longer.

  • Carbohydrates: Lower than traditional recipes, especially if you use low-carb sweeteners.
  • Proteins: Higher, especially if you include eggs and almond flour.
  • Fats: Healthy fats from nuts, seeds, or coconut oil provide long-lasting energy.

Comparing Flourless Bread to Traditional Recipes

When you compare this recipe to one made with all-purpose flour, the differences are significant:

  • Traditional banana bread tends to spike blood sugar due to refined flour and sugars.
  • Flourless versions offer sustained energy, making them perfect for breakfast or a midday snack.
  • You avoid processed ingredients and focus on natural, whole foods.

“Eating well doesn’t mean giving up on treats—it means redefining them.”

Final Thoughts: Enjoying a Guilt-Free Treat

So, there you have it—a complete guide to making and enjoying flourless banana bread. Whether you’re baking for yourself, your family, or friends, this recipe is sure to impress. And the best part? You don’t need to compromise on flavor to make it healthy.

Encouragement to Experiment

Don’t be afraid to put your own spin on this recipe. Want to make it spicier? Add some nutmeg or ginger. Craving a decadent twist? Try a chocolate drizzle on top. Your kitchen is your playground—have fun with it!

Sharing Your Recipe with Others

Once you’ve nailed your version, share it with the world. Post it on social media, gift a loaf to a neighbor, or teach your kids how to bake it. Recipes like this are meant to be passed down and shared. 🌟

In conclusion, flourless banana bread is more than just a recipe—it’s a celebration of natural ingredients, creativity, and mindful eating. So, grab those ripe bananas, and let’s get baking! 🍌

How Long Should You Brine Salmon For?

Brined salmon filet served with roasted vegetables and lemon

Salmon is one of the most loved fish out there. Whether you’re baking, grilling, or pan-searing, a perfectly brined salmon can take your dish from ordinary to extraordinary. But here’s the burning question: how long should you actually brine salmon for? Let’s dive deep into the world of brining, uncovering tips, tricks, and even solutions to common mistakes.

Introduction:

Fresh salmon filets on a cutting board with salt and herbs

What Is Brining and Why Is It Important?

Brining is like giving your salmon a flavorful spa day. It’s a process where you soak or coat the fish with a salt-based solution to enhance its taste and texture. The salt works its magic by drawing out moisture and then reintroducing it along with any flavors you’ve added. The result? Juicy, tender salmon every single time.

For a smoked version, learn more about the smoked salmon brine recipe to take your culinary skills up a notch.

Benefits of Brining Salmon

Why bother brining salmon, you ask? Let me count the ways! First, it adds flavor. That salty, herby goodness seeps into every bite. Second, it keeps your salmon from drying out during cooking. Nobody wants a sad, rubbery filet. Lastly, it helps with even cooking, making sure the fish stays perfectly flaky.

“Brining salmon isn’t just a step; it’s the secret handshake to unlock maximum flavor.” 🎣✨

Types of Brining Methods

Wet Brine: A Classic Approach

Wet brining involves submerging your salmon in a liquid solution made of water, salt, and seasonings. Think of it as a flavorful bath. It’s ideal for infusing bold, balanced flavors into your fish.

Dry Brine: A Modern Twist

Dry brining skips the water and uses a mixture of salt, sugar, and spices rubbed directly onto the fish. It’s less messy and quicker, but it still packs a punch in flavor.

For tips on seasoning balance, check out the salmon rice bowl recipe that pairs well with brined salmon.

Pro Tip: Use dry brining when you’re short on time, but wet brining if you want more control over the flavor intensity.

How Long Should You Brine Salmon?

The Ideal Brining Time for Wet Brine

For wet brining, timing is key. Generally, 8–12 hours is perfect for thick salmon filets. If you’re working with thinner cuts or portions, you can scale it back to 4–6 hours. This range allows the flavors to infuse without overpowering the fish.

The Ideal Brining Time for Dry Brine

Dry brining is faster. A good rule of thumb? Let the salmon rest with the dry mixture for about 2–4 hours. It’s enough time to draw out moisture and let those flavors sink in.

Factors Affecting Brining Time

Not all salmon is created equal. The brining time depends on:

  1. Cut Thickness: Thicker filets need more time than thin slices.
  2. Salt Concentration: A strong brine solution needs less time, while a milder one can go longer.
  3. Temperature: Brining in a cooler environment (like the fridge) takes longer than room temperature.

“Think of brining time as a dance between salt, time, and fish thickness. Too long, and the fish can turn overly salty; too short, and the flavors won’t shine.”

Step-by-Step Guide to Brining Salmon

Salmon filet being dipped into a bowl of brine solution

Let’s get down to business. Brining might sound like a culinary challenge, but trust me, it’s easier than you think. Follow these simple steps, and you’ll have perfectly brined salmon in no time.

Preparing the Brine Solution

Here’s where the magic starts. Whether you’re going wet or dry, creating the right brine is crucial.

For Wet Brine

  1. Gather Ingredients: You’ll need water, kosher salt, sugar, and any optional add-ins like herbs, garlic, or citrus.
  2. Mix It Up: In a large bowl, dissolve 1/4 cup of salt and 1/4 cup of sugar in 4 cups of water. Stir until fully dissolved.
  3. Customize: Add your chosen flavorings. Dill and lemon are classic, but you can get creative with spices like paprika or crushed peppercorns.

For Dry Brine

  1. Mix Dry Ingredients: Combine 3 tablespoons of kosher salt with 1 tablespoon of sugar. Add optional herbs or spices.
  2. Coat the Salmon: Rub the mixture evenly over the fish, ensuring every inch is covered.

Quick Tip: Use fresh, high-quality ingredients for the best flavor. A fresh herb can elevate your brine to a gourmet level. 🌿✨

Choosing the Right Container

You don’t need fancy equipment, but choosing the right container can make all the difference. For wet brines, go for a non-reactive bowl or a resealable plastic bag. Dry brines work great on a tray lined with parchment paper. Make sure there’s enough space for the salmon to sit flat.

Submerging and Storing

If you’re using a wet brine, fully immerse the salmon in the liquid. Place a small weight on top to keep it submerged if needed. Cover the container and store it in the fridge.

For dry brines, place the coated salmon on a tray and cover it loosely with plastic wrap. Refrigerate it to let the flavors do their thing.

“Brining salmon is like marinating, but with superpowers. It’s the difference between ‘meh’ and ‘wow’ on your dinner table.” 🎣🔥

Common Problems While Brining Salmon

Even though brining is simple, things can go wrong. Let’s tackle some of the most common issues and how to fix them.

Over-Brining: How to Avoid It

Over-brining happens when the fish sits in the brine for too long, turning overly salty and mushy. To avoid this:

  • Stick to recommended times (8–12 hours for wet brine, 2–4 hours for dry brine).
  • Set a timer or alarm to remind you when it’s done.

Tip: If you accidentally over-brine, rinse the salmon under cold water and pat it dry. It won’t erase the salt, but it’ll help balance the flavor.

Under-Brining: Signs and Remedies

Under-brining is when the salmon doesn’t sit long enough to absorb the flavors. The result? A bland piece of fish. To fix this:

  • Always plan your brining time based on the thickness of your salmon.
  • If you’re short on time, increase the salt concentration slightly (but don’t overdo it).

Maintaining Food Safety During Brining

Brining involves raw fish, so food safety is crucial. Always brine in the fridge and avoid letting the fish sit at room temperature for too long. And don’t reuse the brine for another batch—it’s a one-time deal.

“When in doubt, keep it cold and clean. Your salmon—and your stomach—will thank you.” ❄️🐟

Solutions to Brining Issues

Mistakes happen, but don’t let them ruin your salmon. Let’s go over practical solutions to brining mishaps and ways to make the process foolproof.

Adjusting Brining Time for Different Cuts

Not all salmon cuts are created equal. A thick salmon steak will need more time than a thin filet. Here’s a quick guide:

  • Thin Filets: 4–6 hours for wet brine; 1–2 hours for dry brine.
  • Thick Steaks: 8–12 hours for wet brine; 2–4 hours for dry brine.
  • Whole Salmon: 12–24 hours for wet brine; 6–8 hours for dry brine.

If you’re ever unsure, it’s better to under-brine slightly than overdo it.

Balancing Flavors in Your Brine

Feeling like your brine lacks oomph? Or maybe it’s too overpowering? The key is balance:

  • Too Salty? Add a bit more sugar to the mix or shorten the brining time.
  • Too Bland? Increase the salt slightly or add bold spices like smoked paprika or chili flakes.

“Think of brining as a canvas. Salt and sugar are the base, and the spices are your colors. Paint boldly!” 🎨🐟

Frequently Asked Questions

Let’s clear up some common doubts about brining salmon.

Can You Brine Salmon Overnight?

Yes, but it depends on the method. For wet brines, overnight (8–12 hours) is perfect for thick cuts. Dry brines, however, usually don’t need that long. If you leave salmon in a dry brine overnight, you risk drawing out too much moisture.

What Happens if You Skip Brining?

Skipping the brine isn’t the end of the world, but you’ll miss out on juicy, flavorful fish. Unbrined salmon can dry out quickly during cooking, and the flavors won’t be as pronounced. If you’re short on time, even a quick 30-minute brine can make a difference.

Enhancing Your Brined Salmon

Now that you’ve brined your salmon, it’s time to turn it into a masterpiece. Here are some tips to elevate your dish.

Cooking Techniques for Brined Salmon

Grilled salmon filets with lemon and dill

The beauty of brined salmon is its versatility. Here are three top methods to bring out its best:

  1. Grilling: Perfect for a smoky flavor. Brush the salmon with oil and grill over medium heat.
  2. Baking: Keep it simple by baking at 375°F until flaky.
  3. Pan-Searing: For a crispy crust, sear the salmon skin-side down in a hot skillet.

Flavor Pairings to Elevate Your Dish

Pair your brined salmon with complementary flavors to make it shine:

  • Citrus: Lemon or orange zest adds brightness.
  • Herbs: Dill, parsley, or thyme bring a fresh, earthy touch.
  • Veggies: Roasted asparagus or garlic mashed potatoes are classic sides.

“A perfectly brined salmon is like a blank page. Your cooking method and pairings turn it into a culinary love letter.” 💌🐟

Conclusion: Perfecting the Art of Brining Salmon

Brining salmon might seem like a small step, but it makes a world of difference. From juicy, flavorful filets to avoiding common pitfalls, this guide has you covered. Remember, it’s all about balance—between time, salt, and flavors. So go ahead, give your salmon the brining treatment and wow your taste buds (and your dinner guests).

“Brining isn’t just about the fish; it’s about the experience. Dive in, experiment, and savor every bite!” 🎣🍽️

Smoked Salmon Brine Recipe

Perfectly smoked salmon fillet served with capers and cream cheese.

Interdiction

Are you ready to unlock the secrets of mouthwatering smoked salmon? Well, you’re in the right place! Brining is the unsung hero behind that tender, flavorful salmon we all love. In this guide, we’ll explore everything you need to know to create the perfect smoked salmon brine recipe. Trust me, once you master this, your friends and family will be begging for more!

Beautifully plated smoked salmon with dill and lemon slices.

Understanding Smoked Salmon and Its Popularity

Smoked salmon isn’t just food; it’s an experience. From breakfast bagels to fancy hors d’oeuvres, this delicacy has captured hearts and taste buds worldwide. But why is it so popular? It’s all about that smoky, savory goodness combined with a melt-in-your-mouth texture. Sounds amazing, right?

Smoked salmon owes its charm to the magic of smoking and brining. If you’ve ever wondered what gives it that rich flavor and moist texture, you’re about to find out.

What Is Brining? A Key Step in Smoking Salmon

Before we dive into recipes, let’s talk about brining. So, what exactly is it? Imagine your salmon taking a flavorful bath—that’s brining. It’s the process of soaking fish in a mixture of salt, water, and other flavor-packed ingredients. This simple step makes a world of difference.

The Science Behind Brining

Here’s a fun fact: brining isn’t just about flavor; it’s about chemistry. When salmon sits in brine, the salt works like magic. It draws out moisture while infusing the fish with flavor. At the same time, it helps the fish retain water during smoking, keeping it juicy and tender.

Why Brine Is Essential for Smoked Salmon

Let’s be real—you don’t want dry salmon. That’s where brining saves the day. It locks in moisture and ensures the fish absorbs all the smoky flavors during the cooking process. Think of it as the secret handshake between you and perfect smoked salmon.

“Brining isn’t just a step; it’s the foundation of smoky, flavorful salmon that melts in your mouth.”

Ingredients Needed for a Perfect Smoked Salmon Brine

Now that we know why brining is a game-changer, let’s gather the ingredients. You don’t need anything fancy—just the basics and a pinch of creativity.

The Base: Salt and Water

Salt is the star of the show. It’s what makes brining effective. Use kosher salt or sea salt—they dissolve beautifully and don’t overpower the flavor. Water, of course, is the base. Together, they form the foundation of your brine.

Adding Sweetness: Sugar Options for Brine

Want to balance out the saltiness? Add sugar! Brown sugar is a classic choice, adding a touch of caramel-like sweetness. White sugar works too. Want to experiment? Try honey or maple syrup for a unique twist.

Enhancing Flavor: Spices and Aromatics

Here’s where the fun begins. Think of spices and aromatics as the supporting cast. Black peppercorns, garlic, dill, or even bay leaves can elevate your brine. Want a smoky kick? Add paprika or chili flakes. Don’t be afraid to get creative!

Overhead view of brine ingredients for smoked salmon, including salt, sugar, and fresh herbs.

Step-by-Step Guide to Making Smoked Salmon Brine

Now that you’ve got your ingredients, let’s get brining! Follow these steps, and you’ll nail it every time.

Measuring Ingredients Correctly

First things first—get the ratios right. A general rule of thumb is 1 cup of salt per gallon of water. For sweetness, add 1/2 cup of sugar. Adjust based on your taste, but don’t skimp on the essentials. Accuracy matters!

Mixing and Dissolving the Brine

Grab a large bowl or pot and mix your ingredients. Stir until the salt and sugar dissolve completely. Pro tip: Warm water helps dissolve them faster, but let it cool before adding your salmon. You don’t want to start cooking the fish too soon!

Can You Make a Poke Bowl with Smoked Salmon?: Perfect for reusing smoked salmon in creative ways.

“A perfectly mixed brine is the first step to culinary success.”

Submerging the Salmon Properly

Place your salmon in a non-reactive container—think glass or plastic, not metal. Pour the brine over the fish, ensuring it’s fully submerged. Got extra brine? Save it for another batch or toss it. Cover the container and pop it in the fridge.

Common Problems When Brining Salmon and Their Solutions

Brining sounds easy, but what if something goes wrong? Don’t worry; I’ve got you covered.

Problem: Overly Salty Brine

Did your salmon turn out too salty? It happens. Next time, rinse the fish with cold water after brining. You can also dilute the brine slightly before using it.

Problem: Uneven Brining

Uneven flavor? Make sure the salmon is fully submerged and the brine reaches every part. Use a smaller container or weigh the fish down with a plate to keep it submerged.

Problem: Texture Issues in the Final Product

Rubbery salmon isn’t fun. This usually happens if you over-brine. Stick to the recommended times—6 to 8 hours is perfect for most fillets.

Salmon Rice Bowl Recipe: A complementary dish to showcase your smoked salmon.

“Remember, less is often more when it comes to brining time.”

Problem: Undesirable Flavors

If your salmon tastes odd, check your ingredients. Freshness matters! Old spices or impure water can affect the final taste. Always use high-quality ingredients.

How Long to Brine Salmon for Optimal Results

Timing is everything when it comes to brining salmon. Too short, and the flavors won’t penetrate. Too long, and you risk ruining the texture. So, how do you get it just right? Let’s break it down.

Quick Brining vs. Long Brining

Short on time? A quick brine of 2-4 hours can still pack a punch. This works well for thinner fillets or if you’re aiming for a lighter flavor. But if you want that rich, deep taste, go for the long haul—6 to 8 hours is the sweet spot for most cuts.

Think of it like marinating. The longer the salmon sits, the more flavor it soaks up. But don’t overdo it! Leaving salmon in brine for more than 12 hours can make it mushy. Nobody wants that.

Factors That Affect Brining Time

Not all salmon is created equal, and several factors can influence how long you should brine:

  • Thickness of the Fillet: Thicker cuts need more time to absorb the brine.
  • Saltiness of the Brine: A saltier brine works faster, so adjust the time accordingly.
  • Personal Taste: Love bold flavors? Go longer. Prefer a subtle touch? Stick to the shorter end of the spectrum.

Tips for Smoking Salmon After Brining

Alright, your salmon is perfectly brined—what’s next? Smoking, of course! But before you fire up the smoker, there are a few steps to ensure your salmon turns out flawless.

Preparing the Salmon After Brining

Once the brining is done, rinse the salmon under cold water. This step is crucial! It removes excess salt from the surface. Next, pat the fish dry with paper towels. The goal is to remove as much moisture as possible.

Here’s a pro tip: Let the salmon sit uncovered in the fridge for 1-2 hours before smoking. This forms a sticky layer called the pellicle, which helps the smoke adhere better. Think of it as the glue that holds all the smoky goodness in place.

Choosing the Right Wood for Smoking

The wood you use can make or break your smoked salmon. Want a mild, slightly sweet flavor? Go for fruitwoods like apple or cherry. For a more robust, traditional taste, hickory or alder are great choices.

Avoid strong woods like mesquite—it can overpower the delicate salmon. And remember, moderation is key. Too much smoke can leave your salmon bitter instead of delicious.

Achieving the Perfect Smoke Temperature

Low and slow is the way to go. Set your smoker to 175°F to 200°F (80°C to 95°C). Smoking salmon is a gentle process, like roasting marshmallows over a campfire. Take your time, and you’ll be rewarded with perfectly cooked, flavorful fish.

Keep an eye on the internal temperature of the salmon. It’s done when it reaches 145°F (63°C). Use a meat thermometer—it’s your best friend in this process.

Why Do Salmon and Rice Go So Well Together?: Understand the harmonious pairing of flavors.

“Smoking salmon isn’t a race; it’s a journey to flavor nirvana.”

Variations of Smoked Salmon Brine Recipes

Now that you’ve nailed the basics, why not mix things up? Brining is incredibly versatile, and you can customize it to suit your taste. Here are a few variations to try.

Classic Smoked Salmon Brine

You can’t go wrong with the classics. This recipe combines the basics: water, salt, sugar, and a touch of black pepper. It’s simple, timeless, and lets the natural flavor of salmon shine.

Ingredients:

  • 1 gallon of water
  • 1 cup kosher salt
  • 1/2 cup brown sugar
  • 1 tbsp black peppercorns

Mix, brine, and smoke—easy peasy!

Sweet and Spicy Brine

Love a little kick? This brine adds a spicy twist to your salmon while keeping it sweet and savory.

Ingredients:

  • 1 gallon of water
  • 1 cup kosher salt
  • 1/2 cup honey
  • 1 tsp chili flakes
  • 1 tbsp smoked paprika

This one’s perfect for those who want to spice things up—literally!

Herb-Infused Brine

Want to elevate your salmon to gourmet status? Add fresh herbs to your brine for an earthy, aromatic touch.

Ingredients:

  • 1 gallon of water
  • 1 cup kosher salt
  • 1/2 cup white sugar
  • 1 bunch fresh dill
  • 1 tsp crushed garlic
  • 2 bay leaves

The result? Salmon that tastes like it came straight from a five-star restaurant.

Health Benefits of Smoked Salmon

Let’s take a moment to appreciate the health perks of smoked salmon. Not only is it delicious, but it’s also packed with nutrients.

Nutritional Value of Smoked Salmon

Smoked salmon is a powerhouse of vitamins and minerals. It’s rich in protein, vitamin D, and B vitamins, making it a great addition to a balanced diet. Plus, it’s low in carbs, making it perfect for keto or low-carb lifestyles.

The Role of Omega-3 Fatty Acids

Here’s the cherry on top: omega-3 fatty acids. These healthy fats support brain function, improve heart health, and even help fight inflammation. Eating smoked salmon isn’t just a treat—it’s an investment in your well-being.

“Every bite of smoked salmon is a tasty step toward better health.”

Frequently Asked Questions About Smoked Salmon Brine

Got questions? You’re not alone. Brining and smoking salmon can seem intimidating, but don’t worry—I’ve got answers to the most common questions people ask.

Can I Freeze Brined Salmon Before Smoking?

Absolutely! If you’re not ready to smoke your salmon right away, freezing it is a great option. After brining, rinse and pat the salmon dry, then wrap it tightly in plastic wrap or vacuum-seal it. Label the package with the date and freeze it for up to three months.

When you’re ready to smoke, thaw the salmon in the fridge overnight. Easy, right? Just remember: never refreeze salmon once it’s been thawed. It messes with the texture and flavor.

What’s the Best Way to Store Smoked Salmon?

Smoked salmon is like a little treasure—you want to keep it fresh for as long as possible. Store it in an airtight container in the fridge, where it’ll stay good for up to a week. For longer storage, freeze it.

Pro tip: Divide the salmon into smaller portions before freezing. That way, you can thaw only what you need.

If you vacuum-seal the smoked salmon, it can last even longer in the freezer—up to six months without losing its flavor or texture.

Can I Reuse Brine for Another Batch of Salmon?

In theory, you could, but it’s not recommended. Reusing brine can introduce bacteria from the first batch, and the flavors might not be as vibrant the second time around. It’s safer and tastier to whip up a fresh batch of brine for each use.

Conclusion: Mastering the Art of Smoked Salmon Brine

Congratulations! You’ve just learned everything you need to know to make smoked salmon brine like a pro. From understanding the basics to troubleshooting common problems, you’re now equipped to create the most flavorful smoked salmon your taste buds have ever experienced.

“Cooking is an art, and brining is your paintbrush. With the right techniques, your smoked salmon will be a masterpiece.”

Whether you stick to the classic recipe or experiment with bold flavors, remember: brining is all about enhancing the natural beauty of salmon. Take your time, enjoy the process, and don’t be afraid to make it your own.

A Quick Recap:

  1. Brining Basics: Use salt, water, and your favorite spices to infuse salmon with flavor and moisture.
  2. Timing Is Key: Brine for 6-8 hours for the best results.
  3. Perfect Smoking: Rinse, dry, and smoke your salmon at low temperatures for tender, smoky perfection.
  4. Health Perks: Enjoy a dish that’s not just tasty but packed with nutrients.

So, what are you waiting for? Grab some salmon, mix up your brine, and let the magic begin. Your next smoky masterpiece is just a brine away.

Final Thought:

Smoked salmon is more than food—it’s an experience. With this guide, you’re not just learning a recipe; you’re mastering a craft. Happy brining and smoking! And hey, don’t forget to share your success stories. I’d love to hear how it goes. 😊

Can You Use Bananas Instead of Flour?

Ripe bananas with baking ingredients on a rustic wooden table.

Introduction

Have you ever looked at overripe bananas and wondered if they could serve a greater purpose than smoothies or banana bread? What if I told you they could become the star ingredient in your baking by replacing flour? Yes, it’s true—bananas as a flour substitute are a game-changer! 🍌

Using bananas as a flour substitute isn’t just a creative twist; it’s a healthier, gluten-free alternative for anyone experimenting with natural ingredients. Whether you’re cutting back on processed foods or trying flourless banana recipes, this approach brings a deliciously wholesome touch to your kitchen.

“Switching to bananas isn’t just a substitution—it’s a game-changer. 🌟”

Why Bananas as a Flour Substitute Are Gaining Popularity.

Bananas are increasingly being recognized as a practical flour substitute. Their affordability, natural sweetness, and nutrient density make them a favorite for health-conscious bakers. With bananas as a flour substitute, you’re not just baking; you’re creating recipes that are rich in vitamins, gluten-free, and packed with flavor.

Bananas offer a unique combination of moisture and creaminess, transforming traditional recipes into healthier versions. From pancakes to muffins, bananas as a flour substitute add both texture and taste.

Who Can Benefit from Bananas as a Flour Substitute?

Using bananas instead of flour isn’t just for gluten-intolerant individuals or those on a special diet. Here’s how this simple swap can help:

  • Gluten-Free Bakers: Bananas are naturally gluten-free and perfect for flourless banana recipes.
  • Health Enthusiasts: If you’re aiming for a clean, processed-free diet, bananas as a flour substitute are a natural fit.
  • Families: Parents love using bananas to sneak extra nutrients into their kids’ favorite snacks.

“Switching to bananas as a flour substitute isn’t just a swap—it’s a way to elevate the health and flavor of your recipes! 🍌✨”

The Science Behind Bananas as a Flour Substitute

Banana pancakes stacked on a plate with syrup and banana slices.

Understanding how bananas work as a flour alternative can help you achieve the perfect bake. Bananas, with their natural starch and moisture content, mimic some properties of flour. While they lack the elasticity gluten provides, bananas make up for it by binding ingredients together, making them ideal for recipes like pancakes and brownies.

By using bananas as a flour substitute, you’re not just replacing an ingredient; you’re adding nutrients like potassium, fiber, and natural sugars that enrich your recipes.

How Bananas Mimic Flour Properties

Flour typically acts as the base for structure in baking. Surprisingly, bananas can mimic this to some extent. Their natural starch and moisture content bind ingredients together, creating a cohesive batter or dough.

While they don’t offer the elasticity of gluten, bananas make up for it by adding richness and softness to recipes like pancakes or brownies.

Nutritional Benefits of Using Bananas

Bananas as a flour substitute come with multiple advantages:

  • Health Benefits: They’re gluten-free, nutrient-rich, and packed with fiber.
  • Natural Sweetness: Bananas reduce the need for refined sugar in your recipes.
  • Whole-Food Option: Using bananas as a flour substitute cuts out processed ingredients, making your baked goods cleaner and more wholesome.

Switching flour for bananas doesn’t just change the recipe—it adds value to every bite.

How Texture and Moisture Affect Baking

Bananas introduce a level of moisture that flour simply can’t. This is why they work so well in soft, dense recipes like muffins or brownies. However, this also means they’re not ideal for light, airy baked goods like cookies or baguettes.

“Think of bananas as the friend who always makes things a little softer and sweeter. 🥰”

When and Where to Use Bananas Instead of Flour

Now that you know the science, let’s talk about when bananas shine as a flour substitute.

Best Recipes for Banana Substitutions

Bananas work best in recipes where softness and moisture are key. Here are some great examples:

  • Pancakes
  • Muffins
  • Brownies
  • Quick breads (like banana bread or zucchini bread)

These recipes thrive on the creamy texture and natural sweetness that bananas provide.

Types of Dishes that Work Well with Bananas

Beyond baked goods, bananas can also replace flour in:

  • Smoothies for added thickness.
  • Protein bars for a chewy texture.
  • No-bake desserts like energy bites.

“Bananas are like the multitaskers of the kitchen—they fit into almost any role!”

Situations Where Bananas Won’t Work as a Substitute

Let’s face it—bananas aren’t perfect for every recipe. Here’s where they might fall short:

  • Yeast Breads: These rely on gluten for structure, which bananas can’t provide.
  • Cookies: If you’re aiming for a crispy texture, bananas won’t deliver.
  • Light Cakes: Bananas can make them too dense and heavy.

Knowing when to use bananas and when to stick to flour is the key to successful baking.

Step-by-Step Guide to Replacing Flour with Bananas

Replacing flour with bananas isn’t difficult, but it does require some adjustments. Follow these simple steps to make your recipes shine.

Determining the Right Banana-to-Flour Ratio

The first thing to understand is how much banana to use in place of flour. While there’s no exact science, a good starting point is:

  • 1 medium banana = 1/3 cup of flour

For recipes that require more structure, you might need to combine bananas with another substitute like oats or almond flour to achieve the desired texture.

“Think of bananas as a building block—they work best when paired with other supportive ingredients.”

Choosing the Right Ripeness for Bananas

Ripeness matters! The best bananas for baking are:

  • Overripe with Brown Spots: These are sweeter and mash more easily, making them ideal for replacing flour.
  • Firm but Ripe: Use these if you want less sweetness and more binding.

Avoid using green bananas, as they can be too starchy and lack the natural sweetness needed for most recipes.

Tips for Mixing and Baking with Bananas

Here are some pro tips to ensure your banana-based recipes turn out perfectly:

  1. Mash Thoroughly: Use a fork or blender to create a smooth, lump-free puree.
  2. Adjust Liquid Ingredients: Bananas add moisture, so you might need to reduce other liquids in your recipe.
  3. Add Leavening Agents: Bananas alone won’t help your baked goods rise. Be sure to use baking powder or soda for lift.

“Baking with bananas is like finding a rhythm—it’s all about balance and harmony. 🍌”

Benefits of Using Bananas Instead of Flour

So, why should you make the switch? Let’s explore the perks of baking with bananas.

Health Advantages for Special Diets

Bananas are naturally gluten-free, making them an excellent option for those with gluten intolerance or celiac disease. Plus, they’re:

  • Low in Fat: Perfect for lighter recipes.
  • Nutrient-Dense: Full of vitamins and minerals.
  • Fiber-Rich: Helps you feel full longer, making them a great addition to healthy snacks.

Adding Natural Sweetness and Flavor

Unlike flour, bananas come with their own built-in flavor and sweetness. This means you can:

  • Use less added sugar in recipes.
  • Enhance the overall taste profile with a natural, fruity note.

Think of bananas as a shortcut to both flavor and health in one ingredient.

Reducing Processed Ingredients

By replacing flour with bananas, you’re cutting out a processed ingredient and replacing it with a whole food. This is especially beneficial if you’re aiming for a cleaner, more natural diet.

“Using bananas instead of flour feels like swapping out a puzzle piece for the perfect fit—it just makes sense.”

Challenges of Substituting Flour with Bananas

Using bananas as a flour substitute isn’t without its challenges. Here’s how to address common issues:

Overly Moist Texture: Combine bananas with drier ingredients like almond or oat flour.

Lack of Rise: Use leavening agents like baking powder or soda to ensure a good lift.

Strong Banana Flavor: Balance with spices like cinnamon or add cocoa powder for a complementary taste.

Overly Moist or Dense Textures

Because bananas are naturally moist, they can sometimes make your baked goods too dense or wet. To avoid this:

  • Reduce the liquid in your recipe.
  • Combine bananas with drier ingredients like oats or almond flour.

Adjusting Recipes to Balance Flavors

Bananas have a distinct taste that doesn’t work well in every dish. If you want to tone it down:

  • Add spices like cinnamon or nutmeg to complement the banana flavor.
  • Pair bananas with cocoa powder or vanilla for balance.

Difficulties in Achieving Rise and Structure

Unlike flour, bananas don’t have gluten, which means they lack the elasticity needed for some recipes. To overcome this:

  • Use eggs or flax eggs as binding agents.
  • Incorporate a bit of baking powder or soda for lift.

“Baking with bananas is like learning a new dance—it takes practice, but the results are worth it! 🥰”

Ready to put bananas to the test? Here are three delicious, flourless recipes that showcase the versatility of this amazing fruit.

Flourless Banana Pancakes Recipe

Fluffy, healthy, and easy to make, these pancakes are a breakfast favorite.

Ingredients:

  • 2 medium ripe bananas (mashed)
  • 2 large eggs
  • 1/2 teaspoon baking powder
  • 1/2 teaspoon vanilla extract
  • A pinch of salt

Instructions:

  1. Mash the bananas in a bowl until smooth.
  2. Whisk in the eggs, baking powder, vanilla, and salt.
  3. Heat a non-stick skillet over medium heat and pour small amounts of batter.
  4. Cook for 2-3 minutes on each side until golden brown.

“These pancakes are like a warm hug on a plate—light, fluffy, and full of flavor. 🥞”

Healthy Banana Brownies Recipe

Moist banana brownies served on a plate.

For a guilt-free dessert, these banana brownies hit the sweet spot.

Ingredients:

  • 3 ripe bananas (mashed)
  • 1/4 cup cocoa powder
  • 1/2 cup almond butter
  • 1/4 cup honey or maple syrup
  • 1/2 teaspoon baking soda

Instructions:

  1. Preheat your oven to 350°F (175°C). Line a baking pan with parchment paper.
  2. Mix all ingredients in a bowl until smooth.
  3. Pour the batter into the pan and bake for 25-30 minutes.
  4. Let cool, then slice into squares and serve.

“Rich, chocolaty, and packed with goodness—these brownies are proof you don’t need flour to indulge! 🍫”

Gluten-Free Banana Muffins Recipe

These muffins are perfect for snacking or packing in lunchboxes.

Ingredients:

  • 2 ripe bananas (mashed)
  • 2 eggs
  • 1/2 cup rolled oats (blended into flour)
  • 1/4 cup almond milk
  • 1 teaspoon baking powder
  • Optional: nuts, chocolate chips, or dried fruit

Instructions:

  1. Preheat oven to 350°F (175°C). Grease a muffin tin or use liners.
  2. Mix the mashed bananas, eggs, and almond milk.
  3. Add the oat flour and baking powder, then fold in any add-ins.
  4. Divide the batter evenly among the muffin cups.
  5. Bake for 20-25 minutes or until a toothpick comes out clean.

“These muffins are little bundles of happiness—soft, moist, and perfectly portioned. 🧁”

Common Problems and Their Solutions

Baking with bananas instead of flour can be tricky. Here’s how to troubleshoot common issues.

How to Prevent Overly Sticky Dough

If your dough feels too sticky, try these tips:

  • Add a bit more dry ingredients like oat flour or ground nuts.
  • Chill the dough for 15-20 minutes before shaping or baking.

Achieving a Perfect Bake Time with Bananas

Banana-based recipes can take longer to bake due to their high moisture content. To avoid underbaking:

  • Use a toothpick to test for doneness—it should come out clean.
  • Lower the oven temperature slightly and extend the bake time for even cooking.

Fixing Texture Issues in Banana-Based Recipes

If your recipe turns out too dense, consider:

  • Adding an extra egg for more structure.
  • Using baking powder or soda to help the batter rise.

“Remember, every baking mishap is just a lesson in disguise. Keep experimenting and have fun!”

Frequently Asked Questions

Still have questions? Let’s clear up some common doubts about using bananas instead of flour.

Can I Use Bananas in All Baking Recipes?

Not exactly. Bananas work best in soft, moist recipes like pancakes, muffins, and brownies. For lighter, airy baked goods, you’ll need flour or a flour alternative.

How Many Bananas Replace One Cup of Flour?

As a general rule, 2-3 medium bananas can replace one cup of flour. However, this depends on the recipe, so adjust as needed for texture and consistency.

HCan Bananas Replace Gluten-Free Flour Alternatives?

Yes, bananas are naturally gluten-free and can be a great alternative. For best results, combine them with other gluten-free ingredients like almond flour or oat flour for added structure.

Conclusion

Is Replacing Flour with Bananas a Healthy Choice?

Absolutely! Using bananas instead of flour adds nutrients, reduces processed ingredients, and enhances the natural sweetness of your recipes. It’s a win-win for health-conscious bakers.

Final Thoughts on Baking with Bananas

Bananas as a flour substitute are revolutionizing the baking world. By replacing flour with bananas, you’re embracing a healthier, gluten-free, and naturally sweet option for your favorite recipes. From pancakes to muffins, this simple ingredient swap can transform your kitchen into a hub of creativity and health.

“For more inspiration on creating healthier recipes, check out our guide to The Ultimate Banana Bread Recipe Using Just 2 Bananas.”

Is Banana Bread Healthy to Lose Weight?

Freshly baked banana bread with bananas and nuts.

Introduction

Banana bread is one of those treats that feels like a warm hug. It’s sweet, comforting, and versatile enough to eat as breakfast, a snack, or even dessert. But if you’re trying to lose weight, you might ask yourself, is banana bread healthy enough to include in your diet?, “Is banana bread healthy to include in my diet?”

The answer isn’t as simple as yes or no—it all depends on the recipe, portion size, and how it fits into your overall eating plan. In this article, we’ll break down the nutritional aspects of banana bread, the potential benefits, and how to enjoy it without derailing your weight loss goals.

“Banana bread doesn’t have to be your guilty pleasure—it can be part of your healthy lifestyle with a few simple tweaks. 🍌”

Banana bread isn’t just a dessert—it’s a cultural phenomenon. From coffee shops to homemade family recipes, this baked good has earned its place as a favorite comfort food. But why is it so popular?

For example, if you’re interested in baking but lack enough bananas, What Can I Use if I Don’t Have Enough Bananas for Banana Bread? offers helpful tips to adapt your recipe creatively.

The Curiosity Around Banana Bread and Weight Loss

People often assume banana bread is healthy because it contains bananas, a nutrient-packed fruit. And while bananas are a great source of potassium, vitamins, and fiber, banana bread often includes sugar, butter, and refined flour. These ingredients can turn a wholesome snack into a calorie-dense treat.

So, does this mean you should avoid it altogether? Not at all! With the right recipe and portion control, banana bread can be a part of your weight-loss journey.

Nutritional Profile of Banana Bread

Let’s take a closer look at what’s inside a typical slice of banana bread. Understanding its nutritional profile can help you make informed choices.

Common Ingredients in Traditional Banana Bread

Most banana bread recipes include:

  • Bananas: The star ingredient, adding natural sweetness and moisture.
  • Sugar: Often added in large amounts, contributing to calorie density.
  • Butter or Oil: These provide richness but can also increase fat content.
  • Flour: Usually refined white flour, which lacks fiber and nutrients.

These ingredients make banana bread tasty, but they also make it less ideal for weight loss in its traditional form.

Calories, Fats, and Sugars: The Key Metrics

On average, one slice of banana bread (about 60-70g) contains:

  • Calories: 200-250
  • Fat: 8-10g
  • Sugar: 12-15g

This makes traditional banana bread a calorie-dense snack. However, healthier recipes, such as The Ultimate Banana Bread Recipe Using Just 2 Bananas, are crafted to reduce added sugar and fat content.

How Nutritional Values Vary by Recipe

Not all banana breads are created equal. A loaf made with whole wheat flour, natural sweeteners, and less oil will have fewer calories and more nutrients than one loaded with sugar and butter. Small tweaks can make a big difference in the healthiness of your banana bread.

“Think of banana bread like a canvas. You can paint it with healthier ingredients and still create something delicious!”

Health Benefits of Banana Bread

Despite its reputation as a sugary treat, banana bread does have some redeeming qualities—especially when made with healthier ingredients.

Natural Sweetness from Bananas

Bananas are the star ingredient for a reason. They’re naturally sweet, which means you can reduce or eliminate added sugar in your recipe. Plus, bananas are packed with potassium, which supports heart health, and fiber, which aids digestion.

Potential Fiber and Nutrient Content

If you swap out refined flour for whole wheat or oat flour, you can boost the fiber content significantly. Fiber helps keep you full longer, making it easier to stick to your weight loss goals. Add-ins like nuts, seeds, or even shredded zucchini can further increase the nutrient density.

Can It Be Part of a Balanced Diet?

The short answer is yes—banana bread can absolutely fit into a balanced diet. The key is to treat it as an occasional snack or breakfast item, rather than an everyday indulgence. Pair it with protein-rich foods like yogurt or eggs to balance out the carbohydrates.

“Healthy eating isn’t about deprivation. It’s about balance, creativity, and enjoying the foods you love in moderation. 🌟”

Challenges of Eating Banana Bread for Weight Loss

While banana bread can be made healthier, it still has its challenges, especially when it comes to weight loss. Let’s break them down.

High Sugar Content in Traditional Recipes

One of the biggest culprits in banana bread is sugar. Most recipes call for at least half a cup of sugar, sometimes more. Combined with the natural sugars from bananas, this can lead to a sugar overload.

Why is this a problem? Excess sugar not only adds empty calories but can also cause blood sugar spikes, leading to energy crashes and increased cravings. For weight loss, it’s essential to manage sugar intake.

Portion Control: The Hidden Culprit

A single slice of banana bread might seem innocent, but let’s be real—who stops at just one slice? The soft, moist texture and irresistible flavor make it easy to overindulge.

Eating two or three slices in one sitting can double or triple your calorie intake, which isn’t ideal when you’re trying to stay in a calorie deficit. This is why portion control is critical.

“Portion control is like setting boundaries—it’s tough at first, but it makes a world of difference in the long run.”

Calorie-Dense Ingredients That Can Sabotage Goals

Ingredients like butter, oil, and even chocolate chips can quickly turn banana bread into a calorie bomb. While these add flavor and texture, they’re not always friendly to weight loss efforts.

The good news? With a few substitutions, you can enjoy banana bread without the guilt. Let’s explore those next.

How to Make Healthier Banana Bread

Banana bread ingredients on a table.

The beauty of banana bread is that it’s incredibly versatile. With a few smart swaps, you can transform it into a nutritious, weight-loss-friendly treat.

Swapping Refined Sugar with Natural Sweeteners

Instead of white or brown sugar, try using natural sweeteners like:

  • Honey: Adds sweetness while providing antioxidants.
  • Maple Syrup: A natural, less processed option.
  • Mashed Bananas: Let the bananas do the heavy lifting by using extra-ripe ones for natural sweetness.

“A simple switch to natural sweeteners can make your banana bread both healthier and more flavorful. 🍯”

Using Whole Wheat or Oat Flour

Refined flour doesn’t offer much in terms of nutrition. Whole wheat or oat flour, on the other hand, is packed with fiber and nutrients. These flours not only make your bread healthier but also keep you fuller longer, reducing the temptation to snack.

Adding Ingredients Like Nuts and Seeds for Fiber

Boost your banana bread’s nutrient content by adding:

  • Chia Seeds: Rich in omega-3s and fiber.
  • Walnuts or Almonds: Add a satisfying crunch and healthy fats.
  • Flaxseed Meal: A great source of fiber and plant-based protein.

These additions turn your banana bread into a mini superfood, perfect for a balanced snack or breakfast.

Best Times to Eat Banana Bread When Losing Weight

Timing matters when it comes to enjoying banana bread. Here’s how to incorporate it into your day without compromising your goals.

Breakfast: Starting the Day with Balanced Nutrition

Banana bread can be a great breakfast option—if you pair it wisely. Instead of eating it alone, try adding:

  • A dollop of Greek yogurt for protein.
  • Fresh fruit for extra fiber and vitamins.
  • A sprinkle of nuts for healthy fats.

This combination creates a balanced meal that keeps you energized throughout the morning.

Post-Workout Snack: Refueling with Energy

After a workout, your body needs carbs to replenish energy and protein to repair muscles. A slice of banana bread with a smear of almond butter is an excellent choice. It’s tasty, satisfying, and provides the nutrients your body craves post-exercise.

Healthy Desserts: Satisfying Cravings Wisely

Craving something sweet after dinner? Banana bread can double as a dessert when you serve it with:

  • A drizzle of dark chocolate.
  • A scoop of low-fat frozen yogurt.
  • A sprinkle of cinnamon for extra flavor.

“Banana bread is like a chameleon—it can be breakfast, a snack, or dessert, depending on how you dress it up. 🎭”

Common Myths About Banana Bread and Weight Loss

Banana bread is often misunderstood when it comes to dieting. Let’s debunk some common myths so you can enjoy it guilt-free.

“Bananas Are Too High in Sugar for Weight Loss”

Yes, bananas contain natural sugars, but they also offer a wealth of nutrients like potassium, vitamin C, and fiber. When used in moderation, bananas are far from the enemy—they’re an essential part of a balanced diet. Plus, their natural sweetness can reduce the need for added sugars in recipes.

“All Banana Breads Are Unhealthy”

This is simply not true. While traditional recipes can be calorie-dense, healthier versions made with whole grains, natural sweeteners, and minimal oil are nutritious and satisfying. Banana bread can absolutely be part of a weight-loss plan when prepared thoughtfully.

“Low-Calorie Versions Aren’t Tasty”

Healthy banana bread doesn’t have to sacrifice flavor. Using ripe bananas, spices like cinnamon, and nutrient-packed add-ins like nuts or dark chocolate ensures your bread is both delicious and diet-friendly. Who says you can’t have the best of both worlds?

“Healthy doesn’t mean boring. Banana bread can still be the star of your snack time with the right ingredients! 🍌✨”

Realistic Expectations for Banana Bread in a Diet

While banana bread can fit into your weight-loss plan, it’s important to have realistic expectations. Let’s talk about how to enjoy it without overindulging.

Moderation is Key

The golden rule of dieting is moderation. A slice of banana bread can be a great addition to your day, but it shouldn’t replace nutrient-dense meals or snacks. Stick to one slice and pair it with a protein or healthy fat for balance.

The Importance of Pairing with Other Healthy Habits

Banana bread alone won’t make or break your diet. To see real results, focus on overall healthy habits, like:

  • Staying active with regular exercise.
  • Prioritizing whole foods over processed ones.
  • Drinking plenty of water.

Banana bread can be a small, enjoyable part of a bigger picture.

Sample Healthy Banana Bread Recipe

Healthy banana bread slice with Greek yogurt and berries.

Want to try making your own weight-loss-friendly banana bread? Here’s a recipe that’s both delicious and nutritious.

Ingredients List

  • 3 medium ripe bananas (mashed)
  • 2 large eggs
  • 1/4 cup honey or maple syrup
  • 1 teaspoon vanilla extract
  • 1 1/2 cups whole wheat flour
  • 1 teaspoon baking soda
  • 1/2 teaspoon cinnamon
  • A pinch of salt
  • Optional: 1/4 cup chopped walnuts or dark chocolate chips

Step-by-Step Instructions

  1. Preheat Oven: Set your oven to 350°F (175°C). Grease a loaf pan or line it with parchment paper.
  2. Mix Wet Ingredients: In a large bowl, combine the mashed bananas, eggs, honey or maple syrup, and vanilla extract. Whisk until smooth.
  3. Combine Dry Ingredients: In another bowl, mix the whole wheat flour, baking soda, cinnamon, and salt.
  4. Combine Everything: Gradually fold the dry ingredients into the wet mixture. Be careful not to overmix. If using nuts or chocolate chips, gently fold them in.
  5. Bake: Pour the batter into the prepared loaf pan and bake for 50-60 minutes. Use a toothpick to check—it should come out clean.
  6. Cool and Serve: Let the bread cool in the pan for 10 minutes before transferring it to a cooling rack. Slice and enjoy!

“Homemade banana bread is like a hug in loaf form—warm, comforting, and made just the way you like it. 🍞💛”

Common Problems and Their Solutions

Even with the best intentions, banana bread can sometimes go wrong. Here are some common problems and how to fix them.

Dry or Crumbly Texture

This often happens when there’s too much flour or not enough moisture. Be sure to measure your flour accurately (use a spoon to scoop and level it) and stick to the recipe’s wet-to-dry ratio.

Overly Sweet or Bland Taste

Too much sugar can overpower the banana flavor, while too little can make the bread bland. Rely on ripe bananas for natural sweetness and use spices like cinnamon or nutmeg to enhance flavor.

How to Avoid High-Calorie Additions

Ingredients like chocolate chips, butter, and sugar can quickly add calories. Use add-ins sparingly and opt for healthier alternatives, like nuts or seeds.

Frequently Asked Questions

Still have questions about banana bread and weight loss? Here are some quick answers.

Is Gluten-Free Banana Bread Better for Weight Loss?

Not necessarily. Gluten-free banana bread can be just as calorie-dense as traditional recipes if it’s loaded with sugar and fat. Focus on overall ingredients rather than just the “gluten-free” label.

Can I Eat Banana Bread Every Day on a Diet?

Yes, but in moderation. A small slice paired with a protein or healthy fat can be part of a balanced diet. Just make sure it fits within your daily calorie goals.

How Can I Store Banana Bread to Keep It Fresh?

Store banana bread in an airtight container at room temperature for up to 3 days. For longer storage, wrap individual slices in plastic wrap and freeze for up to 3 months.

Conclusion

Can Banana Bread Fit Into a Weight Loss Plan?

The answer is a resounding yes! With thoughtful ingredient swaps, portion control, and mindful eating, banana bread can be a delicious part of your weight-loss journey.

Final Thoughts on Enjoying Banana Bread Responsibly

Banana bread isn’t just a treat—it’s a versatile snack that can adapt to your lifestyle. Whether you’re enjoying a slice with breakfast or as a post-workout snack, it’s all about balance and making it work for you.

So go ahead, bake a loaf, and enjoy every bite—guilt-free! 🍌✨